CIC Maker — user manual
CIC Maker makes Cleaning Instruction Cards for food-factory equipment. You build a card on screen and it gives you a printable A4 document — chemicals, contact times, method steps, PPE, photos and a sign-off — that you can put on the wall, hand to an auditor or open on a tablet.
It runs in your web browser. Nothing is uploaded anywhere. Everything stays on your own computer.
- Three ways to start
- Signing in
- What is in the folder
- The template files you can edit
- The library
- Building a card
- Chemicals, tools and icons
- Photos, cropping and pins
- Responsibilities and their colours
- A second language
- Authorising a card
- Printing, exporting and importing
- Using it on a phone
- If something goes wrong
Every picture below is a screenshot of the real tool. If you would rather see the finished thing first, open the example card — that is exactly what CIC Maker produces.
New to cleaning cards altogether? What a Cleaning Instruction Card is covers what the document contains, what an auditor looks for, and how it differs from a hygiene SOP.
Reading this on a phone? Some of the screenshots are wider than your screen. Swipe those ones sideways to see the whole thing.
1. Three ways to start
The first screen asks where your work should live. You can change your mind later.
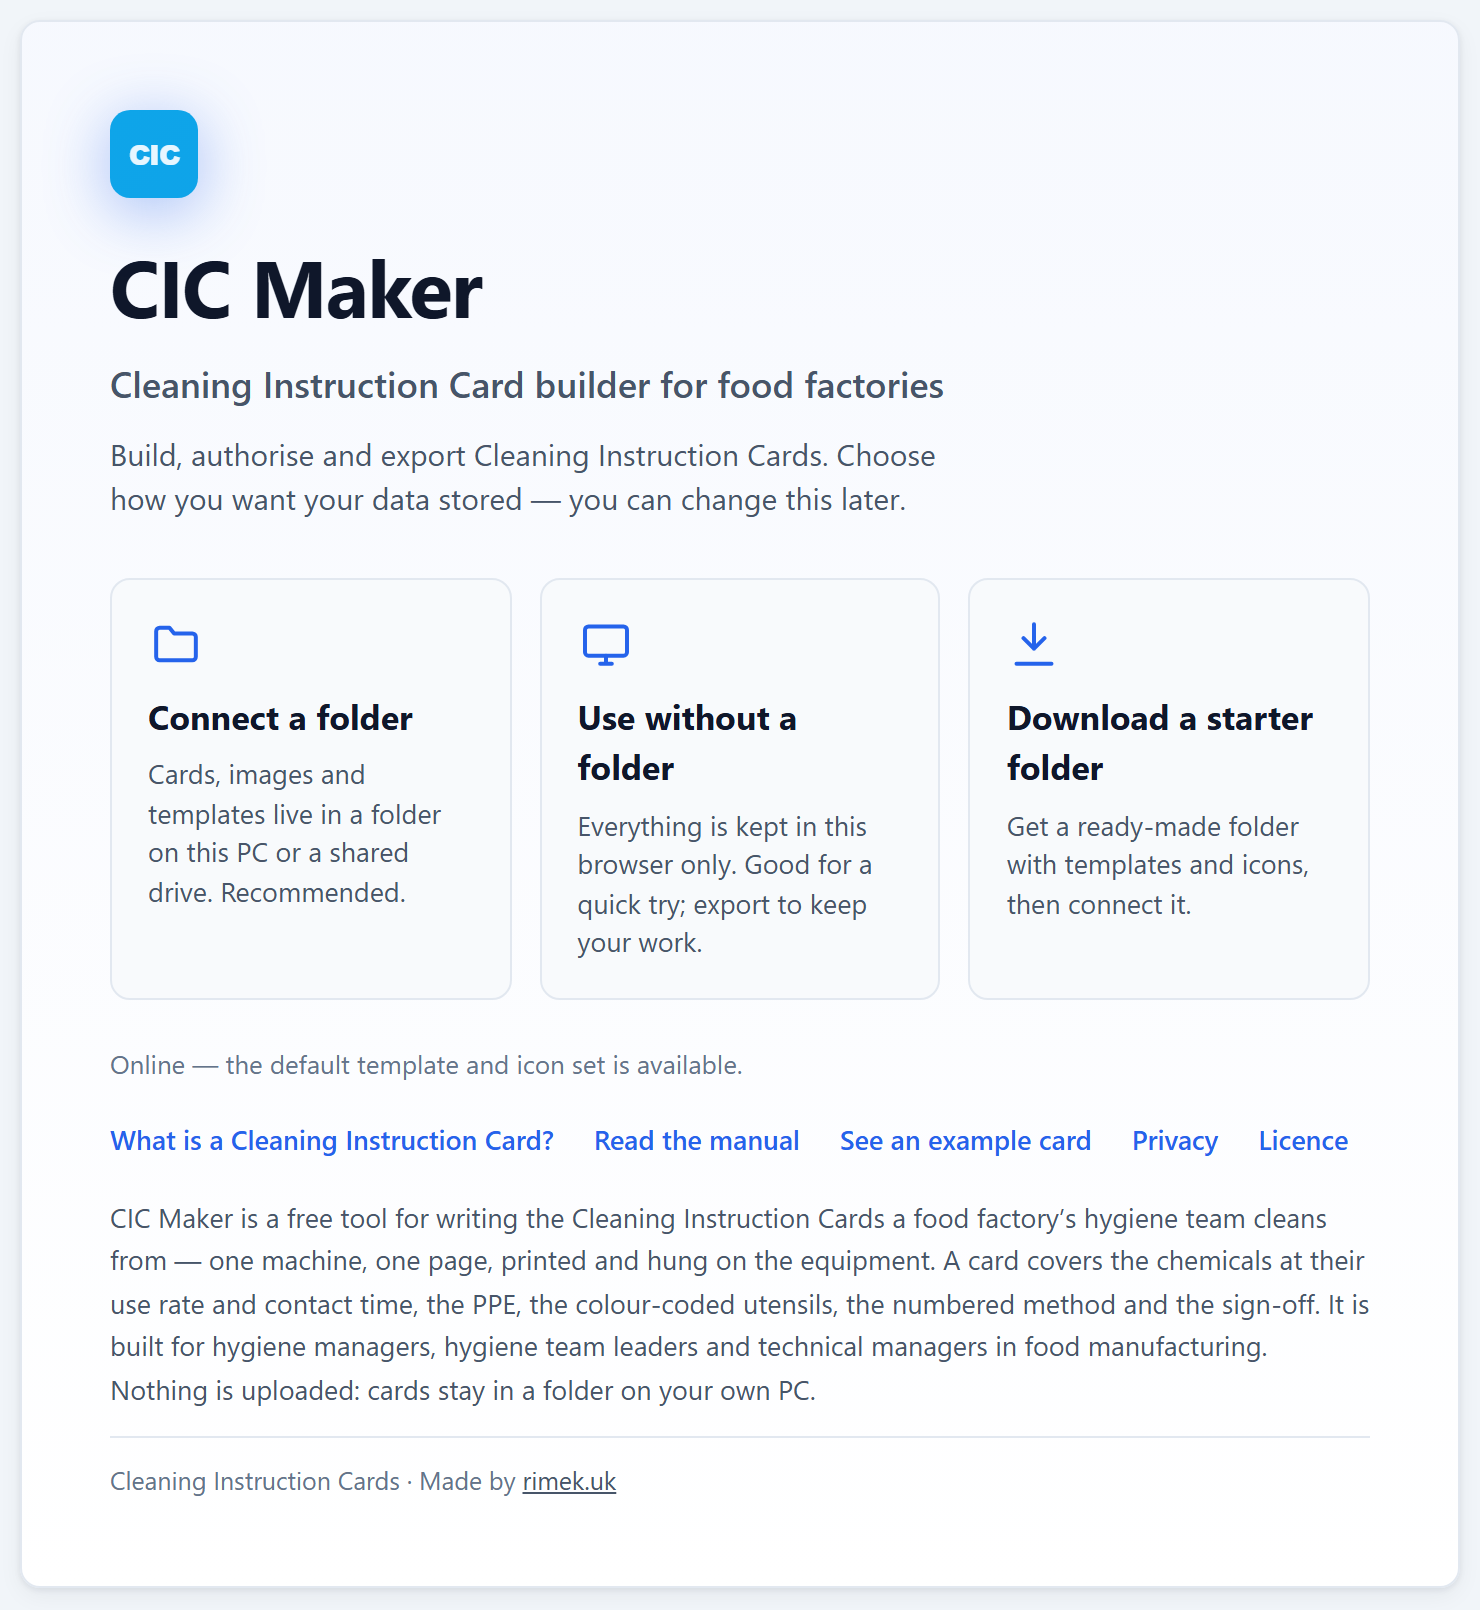
Just try it — “Use without a folder”
Press Use without a folder and you are in. You can build a whole card, look at the print preview, Print it and Download it, without connecting anything.
This is the fastest way to see whether the tool suits you. It is not where you should keep real cards.

What “not saved” really means. Your work is kept inside this one browser, on this one computer. It survives closing the tab and restarting the machine. It does not survive clearing the browser’s site data, using a different browser, using a different PC, or an IT policy that wipes browsing data overnight. Nobody else can see it. If the card matters, either connect a folder or press Download and keep the file.
Connect a folder — the proper way
Press Connect a folder and choose a folder on your PC or a shared drive. Your browser asks permission first, and CIC Maker can only ever see the folder you picked — nothing else on the machine.
From then on your cards, photographs, templates and change logs are ordinary files in that folder. They can be backed up, put on OneDrive, opened by a colleague, or read without CIC Maker at all.
This needs Chrome or Edge on a desktop or laptop. If the button is greyed out, your browser cannot do it — use browser-only mode instead.
Download a starter folder
This gives you a ZIP file — CIC-Maker-Data.zip — with the whole folder already built: every template file listed below, the full icon set, the empty folders the app writes into, and a README.txt that explains the layout. Unzip it somewhere sensible (OneDrive, a network share), then come back, press Connect a folder and pick it.
You do not have to start this way. Connect an empty folder and the app writes the same template files into it and uses the same built-in icons. What the starter pack buys you is every one of those files sitting on disk from the first minute — so you can open them in Excel, put the folder on a share, or hand it to somebody else before anybody has built a card.
2. Signing in
This is not an account and there is no password. You give a first name, a surname and a position.
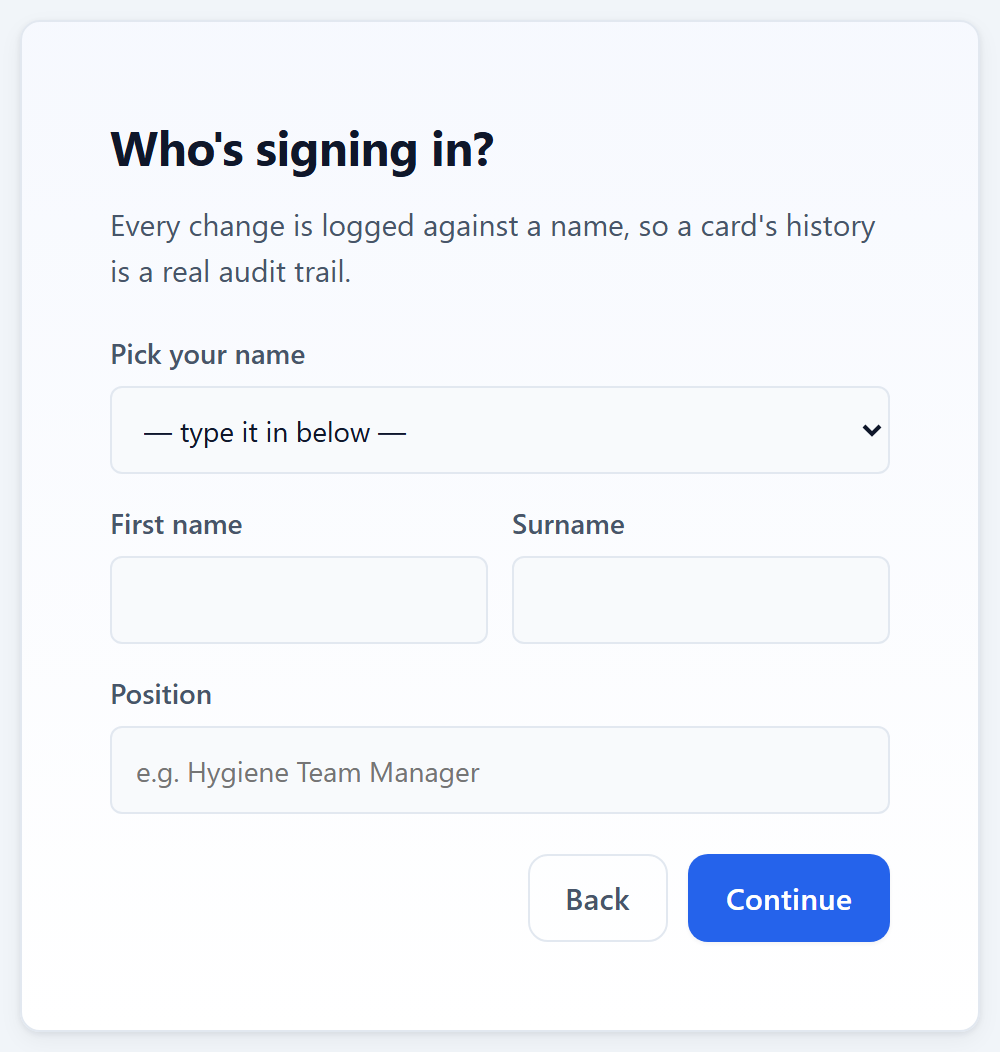
Why bother? Because every change you make from now on is recorded against that name in the card’s history. That is what turns the change log into an audit trail an auditor will accept — who changed what, and when.
If your folder has a people.csv file, you can pick your name from a list instead of typing it.
Unsaved work, and signing out
While you type, the app keeps a background copy of the card you are working on. If the machine or the browser stops before you press Save draft, the next time you sign in it offers to bring that work back.
That background copy is filed under your name. On a shared folder that matters: you are only ever offered your own unsaved work, never a colleague’s, and their copy is left alone rather than tidied away. Signing in on two machines under the same name does share one copy, so the newer one wins — still your own work either way.
Sign out deliberately throws unsaved work away, including that background copy, so the next person to sign in cannot save your half-finished card under their name. If there is anything unsaved when you press it, the app says so and asks first. Answer Keep editing and nothing is touched.
3. What is in the folder
When you connect a folder, CIC Maker fills it with a numbered structure. Each folder answers one question.
Your folder/
├── 02_Templates/    the lists you pick from  ← the only folder you edit by hand
├── 03_Assets/       icons, and your company logo
│     ├── 01_Icons/  PPE, tools, controls, chemical classes
│     └── 02_Branding/  the logo you upload
├── 04_Images/       photographs, one subfolder per card
├── 05_Cards/        the cards themselves, plus _Drafts/
├── 06_Exports/      the finished HTML cards, filed by site and area
├── 07_Log/          the change log, one file per card
└── 08_Archive/      archived cards and safety copies — nothing is hard-deleted
Cards are saved as plain JSON and templates as plain CSV. If CIC Maker vanished tomorrow, your data would still open in Notepad and Excel. That is deliberate.
Two of those folders hold working files you can ignore. 07_Log/ keeps the background copy of whatever each person currently has open, one file per person, alongside the change logs; and while a multi-step job such as a rename is running it keeps the record that lets the app finish or undo it cleanly. 08_Archive/ holds one dated folder per archived card, and beside it a matching ….exports folder with that card’s exported files, taken out of circulation with it.
Two rules worth knowing:
- Edit
02_Templates/freely. That is yours. - Do not hand-edit
05_Cards/or07_Log/. Those are the app’s record of what changed and who changed it. Editing them by hand breaks the audit trail.
Sharing the folder with colleagues
Several people can work in the same folder. Before the app writes over a file it looks at what is actually there, and refuses if that file has changed since it last read it. So the ordinary case — two people on the same card minutes apart — is caught, and the second person is told rather than the first person’s work disappearing quietly.
That is a check, not a lock. A web browser gives no way to claim a file and hold it, so a small gap remains between the app’s last look and its write. Two people on two machines saving the same card in the same instant can still land on top of one another. Nothing available to a browser closes that gap, so it is written here rather than dressed up. In practice, agree who owns a card before two people open it — the same habit a shared spreadsheet needs.
4. The template files you can edit
Everything the app offers you in a dropdown comes from a CSV file in 02_Templates/. Open them in Excel, change them, save as CSV, and the new choices appear the next time the app loads that folder.
| File | What it controls |
|---|---|
people.csv | The sign-in list. Columns: id, firstName, surname, position, active. |
areas.csv | Your sites and areas, and the colour each area prints in. Columns: siteId, site, areaId, area, colour. The colour is a hex value like #2563eb and it becomes the colour of the card’s header band — but only for the colours the card knows how to print. Those are the six cleaning-frequency bands (#e03131 red, #f76707 orange, #f2c200 yellow, #2f9e44 green, #1971c2 blue, #7048e8 purple) plus a handful of older shades. Put any other hex in and the card prints its default navy band instead: the app writes a warning to its diagnostics saying which area and which colour it could not use, so a colour is never quietly swapped for one you did not choose. If you need a shade that is not on the list, ask for it to be added — it is a one-line change to the app, not something the CSV can do on its own. |
chemicals.csv | Your products — code, name, class, use, contact time, use rate, default PPE, default tools, safety data sheet link, temperatures. Picking a product on a card fills all of that in for you. |
colourcode.csv | Your cleaning-utensil colour code — the chart printed at the foot of every card. Columns: name, description, hex, plus swatch2 and swatch3 for striped or taped colours. |
responsibilities.csv | The roles a section or a step can be assigned to, and the colour each one prints in. Columns: id, label, colour, isDefault, sortOrder. |
config.csv | Settings, as key and value. footerText is the line printed at the bottom of every page. logoFile names your company logo — see below. maintmasterBase is the web address the Fault reporting section builds its QR code from; leave it blank if you do not use one. |
roles.csv | The responsible-person names offered in the card’s detail fields. |
methods.csv | Named cleaning methods, such as Deep Clean or Rinse & Sanitise. |
step-starters.csv | Shipped, but nothing reads it yet. The file ships in the folder and the app parses it, and no part of the app offers its contents anywhere — there are no ready-made opening steps. It is listed here so the folder is fully accounted for, not because it does anything. |
safety-defaults.csv | Shipped, but nothing reads it yet. Same as the row above: the file is parsed and no part of the app uses it. Standard safety wording is typed onto the card. |
defaults-ppe.csv, defaults-controls.csv | The PPE and control icons put on every new card automatically. |
custom-fields.csv | Ready-made labels for the custom section, such as Allergen Zone or Water Point. |
acronyms.csv | Words to leave in capitals when the app tidies up a caption — so RTE does not become Rte. |
chem-colour-options.csv | The colour names offered in the Colour code box on a chemical row. Nothing else reads it. (Called colour-code.csv before August 2026 — renamed because it sat one hyphen away from colourcode.csv, which is a different file with a different job.) |
risk-assessments.csv | Your risk assessments. Columns: code, title, url, plus title_pl and the like for other languages. Type a code into a card’s Risk assessment reference and the card prints that title at the foot and turns the reference number into a link to the document. |
A connected folder always wins over the built-in defaults. Your lists replace the shipped examples; they are not merged with them.
Your company logo
The logo is set once and then prints on every card. In the library, use the Company logo → Upload… button.
Behind the scenes the file is copied into 03_Assets/02_Branding/ and its filename is written into config.csv under the key logoFile. So if you ever want to swap the logo by hand, put the new image in that folder and put its filename in that cell. If logoFile is empty, the card prints the site name in the header instead.
5. The library
The library lists every card you have, with its reference, title, area, status and the date it last changed. On the very first run it is empty and tells you what to press.
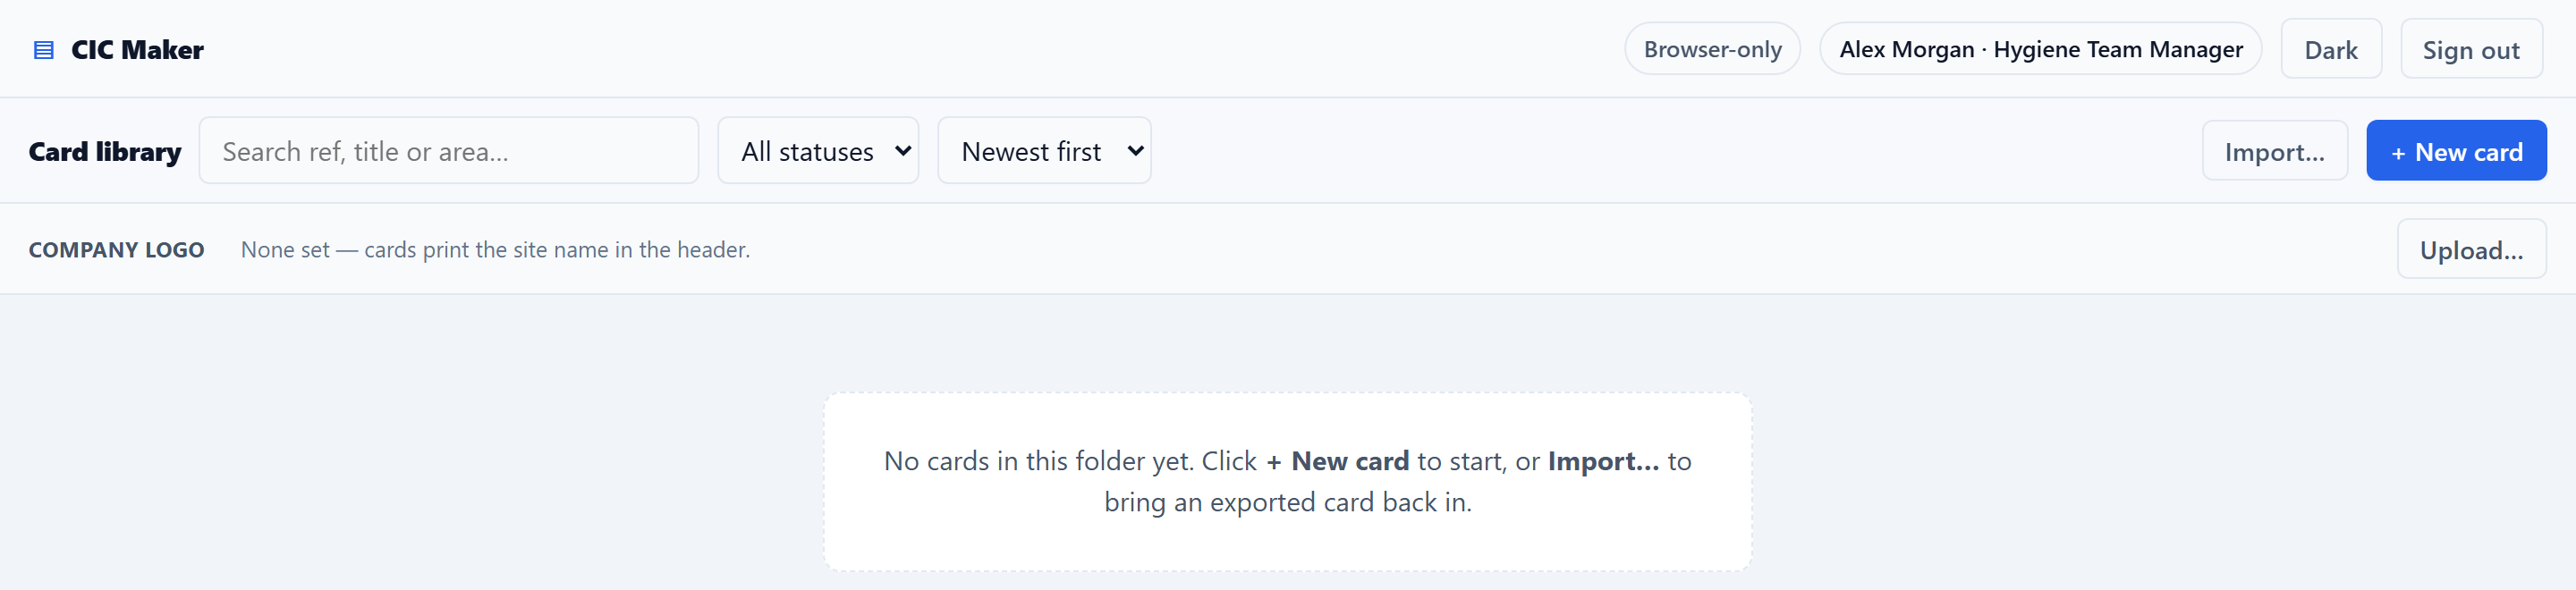
With a card or two in it:
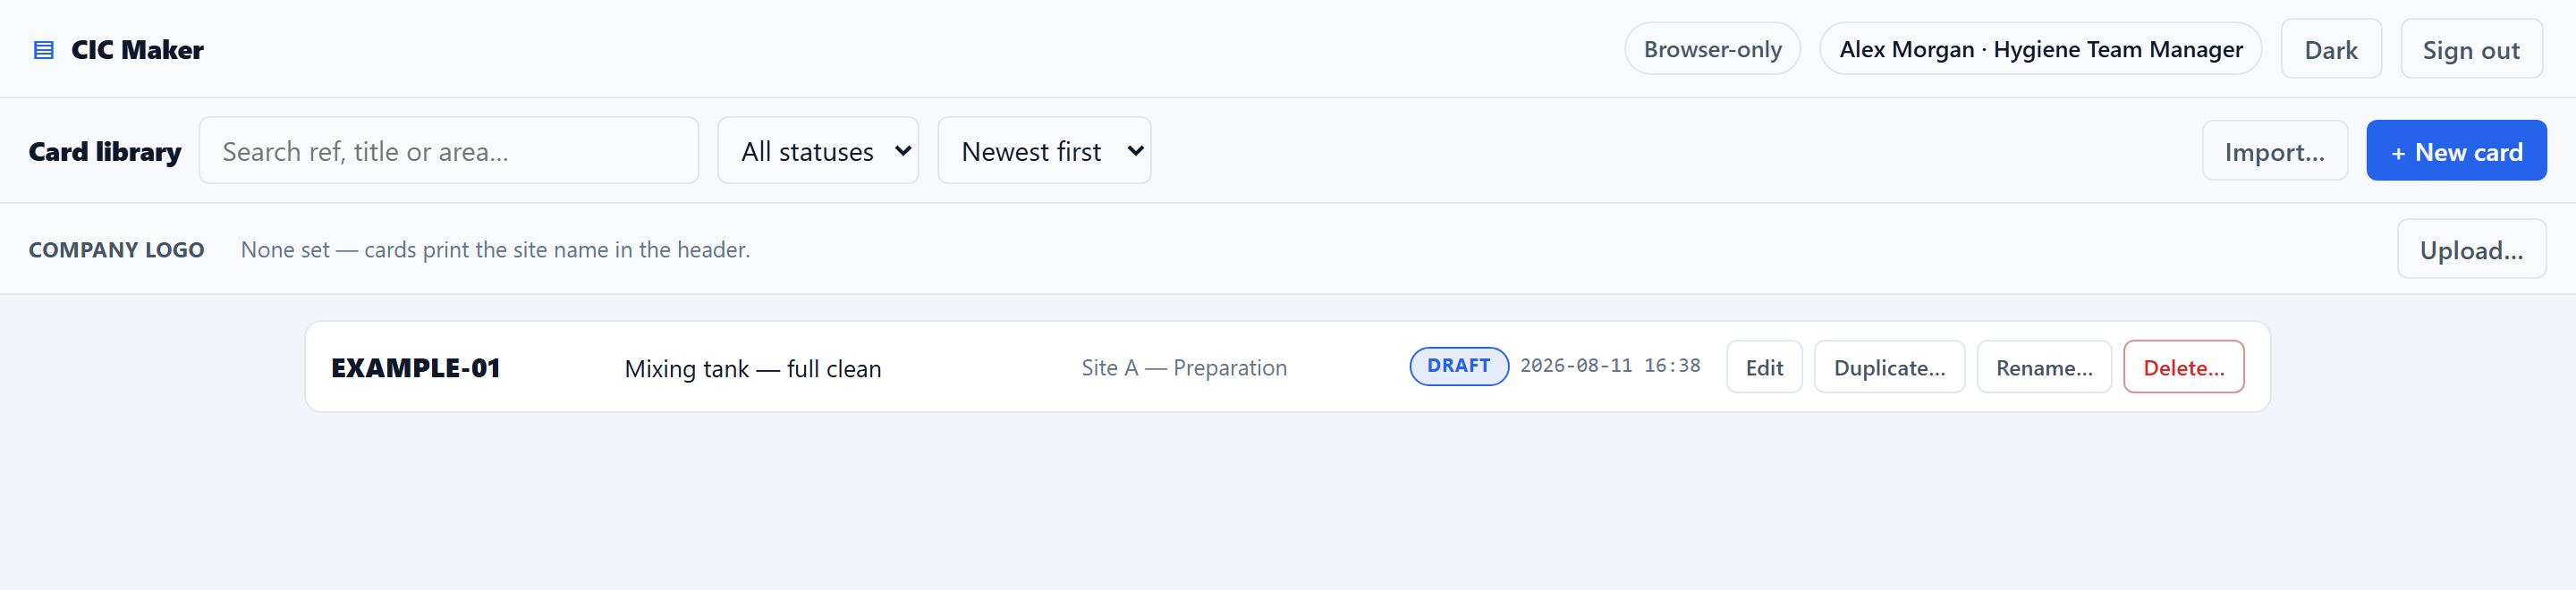
- + New card — start one. The reference you give becomes its filename, its image folder and its log file, so pick it carefully.
- Edit — edit the draft, or start a new draft from the authorised copy. The row itself is not clickable: the four buttons on the right are the only way in, so nothing happens by accident.
- Duplicate… — copy an existing card, photographs included, under a new reference. This is the fastest way to make your second card.
- Rename… — change the reference. The card, its images, its exported HTML and its log all move together in one step, so nothing is left behind in an area folder under the old reference. If any part of it fails, the whole rename is rolled back — you never end up with half a card under one name and half under another. One thing a rename cannot do: the exported file still prints the old reference inside until you export the card again, so do that next.
- Delete… — take a card out of circulation. Nothing is destroyed. The button says Delete because that is what people reach for, and what it actually does is archive: the card moves to
08_Archive/, and its exported HTML is taken out of the area folders and kept with the archive record — an archived card must not stay printable off the wall folder. The confirmation box says all of this before you press it, and Restore brings the card back. - Restore — bring an archived card back. Set the status filter to Archived to see them, then press Restore on the row. Its exported files go back into the same area folders they came from.
- Import… — bring in an exported card file from somewhere else. See printing and exporting.
The search box filters on reference, title and area. The two dropdowns filter by status and change the sort order.
6. Building a card
The editor has two halves: the controls on the left, and a live print preview on the right. The preview updates as you type.
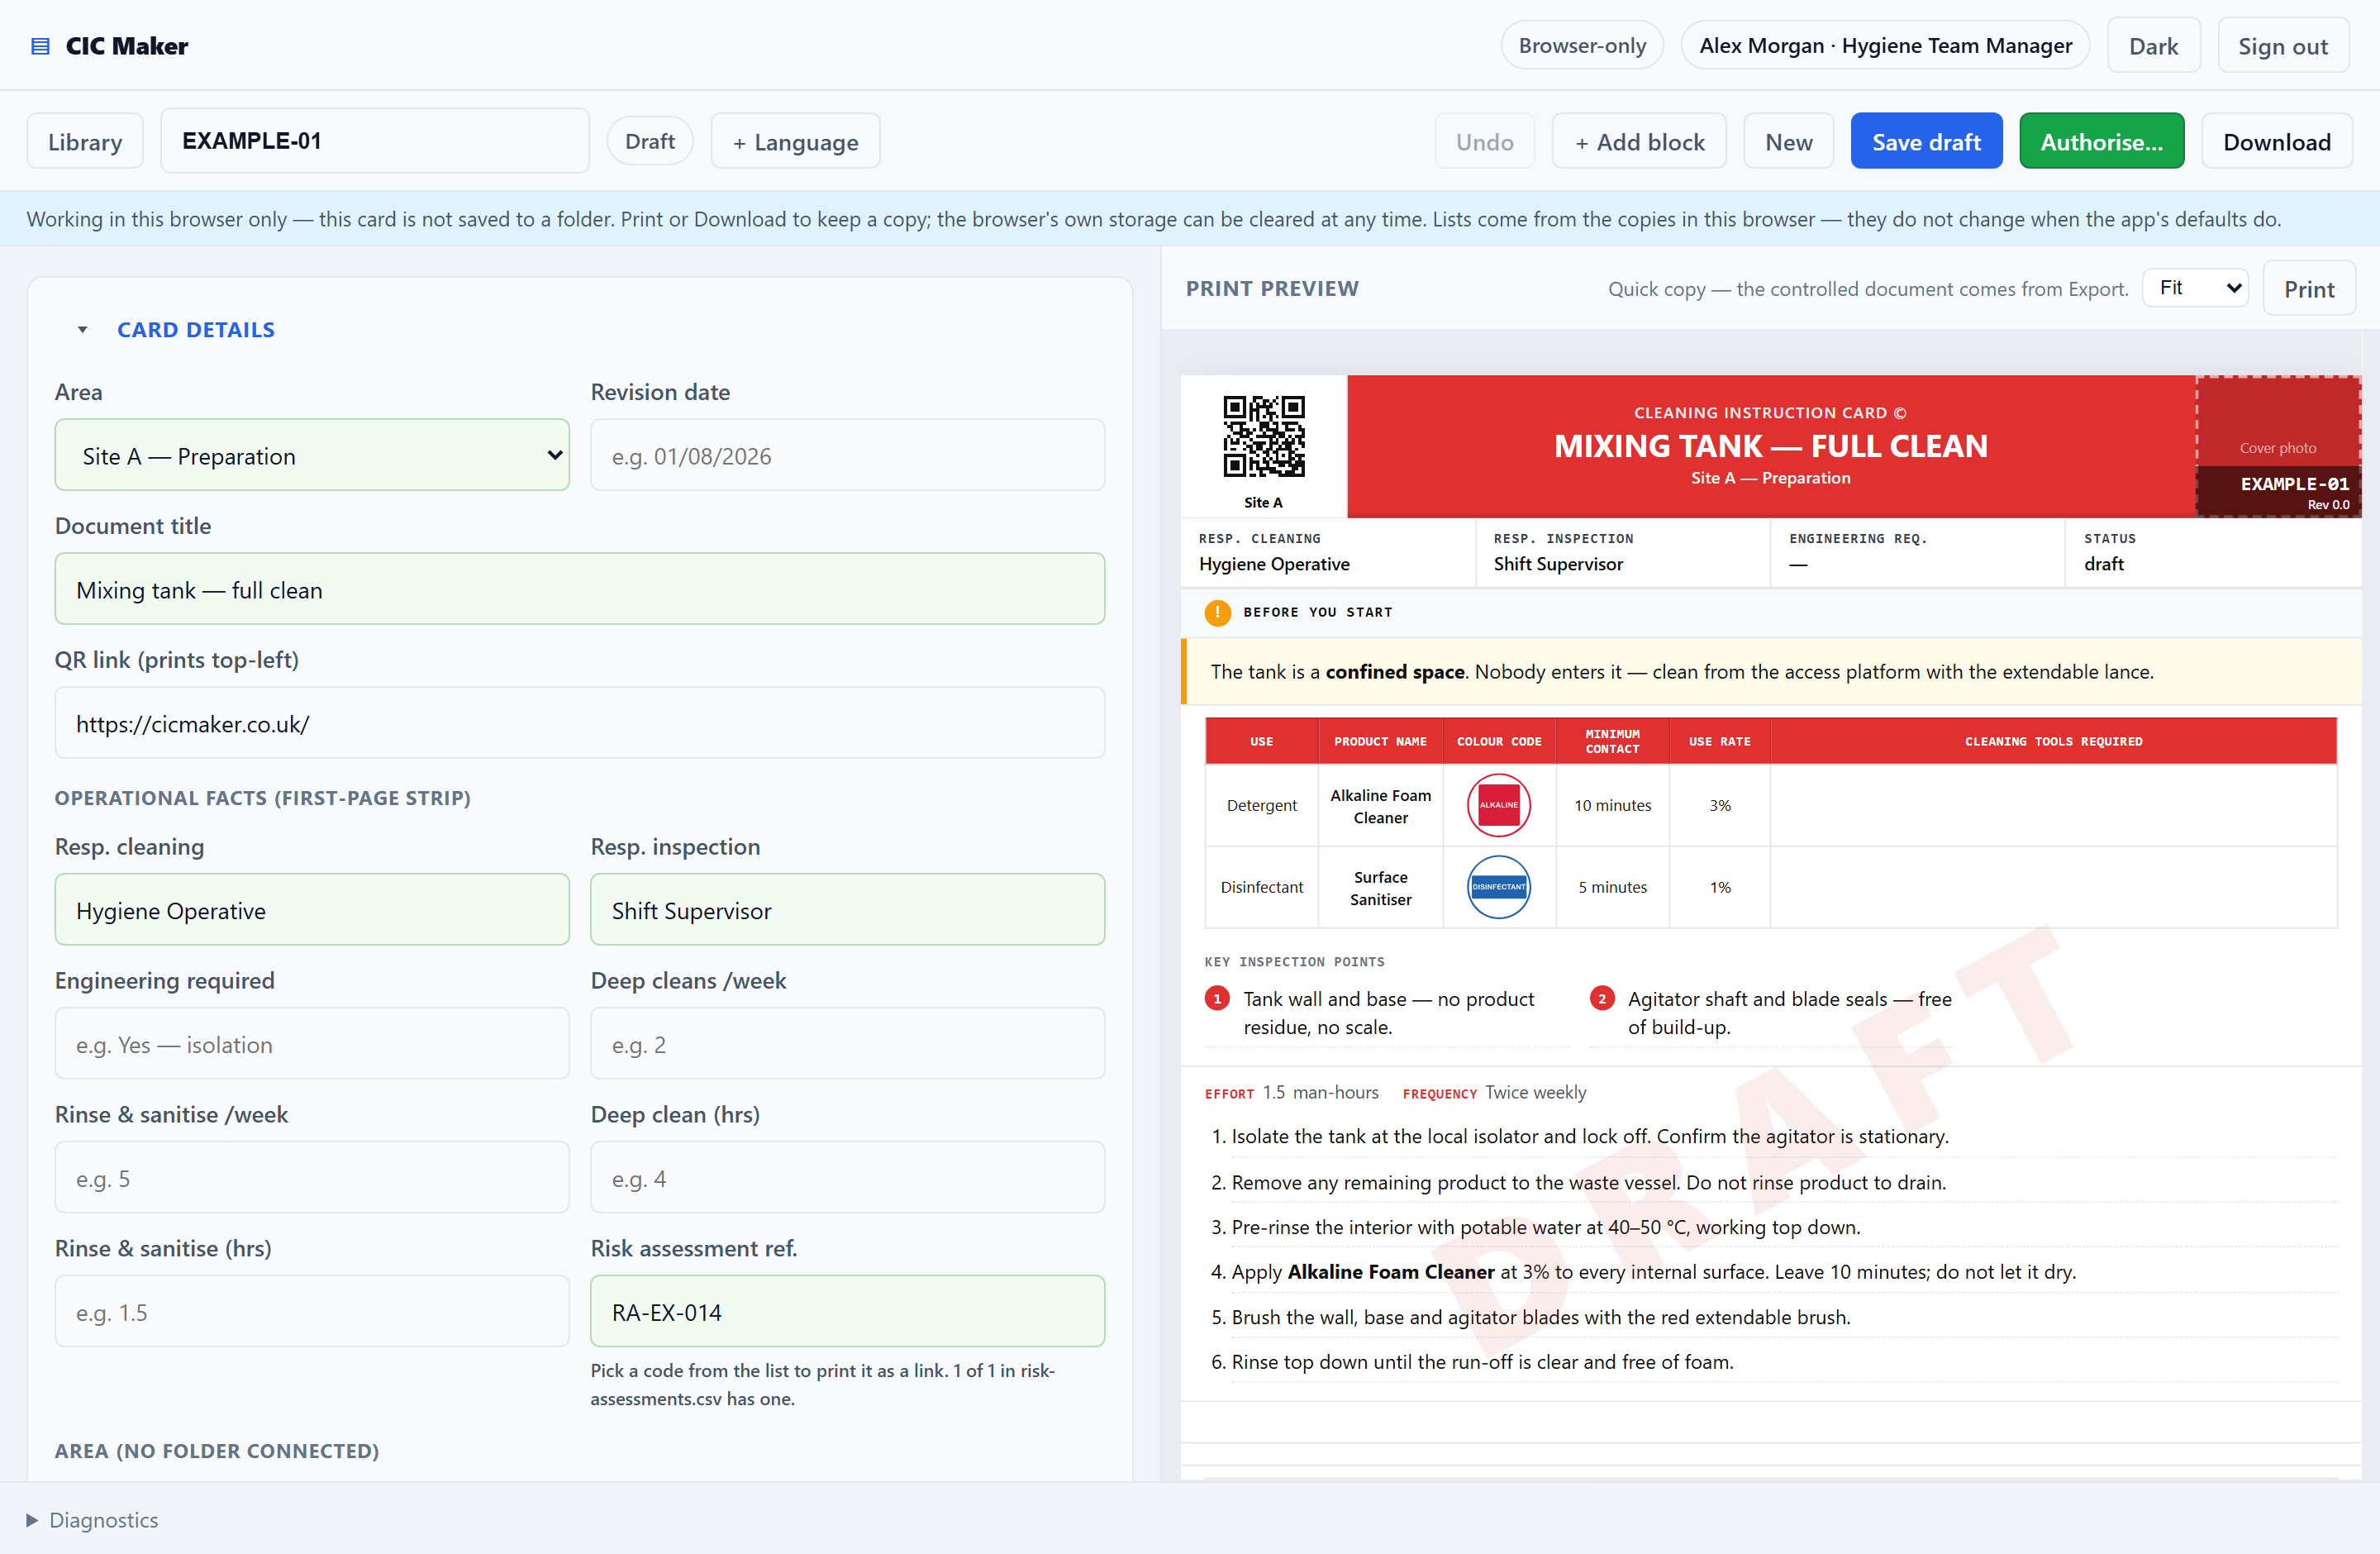
The preview is a quick copy for working in. The controlled document — the one that counts — is what Export produces. They are built by the same code, so they look the same.
The toolbar

- Undo steps back through your edits in this session. Ctrl+Z works too.
- Save draft writes the draft to the folder (or to this browser). Do it often.
- Authorise… turns the draft into the controlled version. See authorising.
- Download hands you the card as a file straight away. It only appears while the card is still a draft.
- Export writes the controlled copy into the folder. It only works on an authorised card.
Card details
The first section holds the things that identify the card and print in its header and top strip.
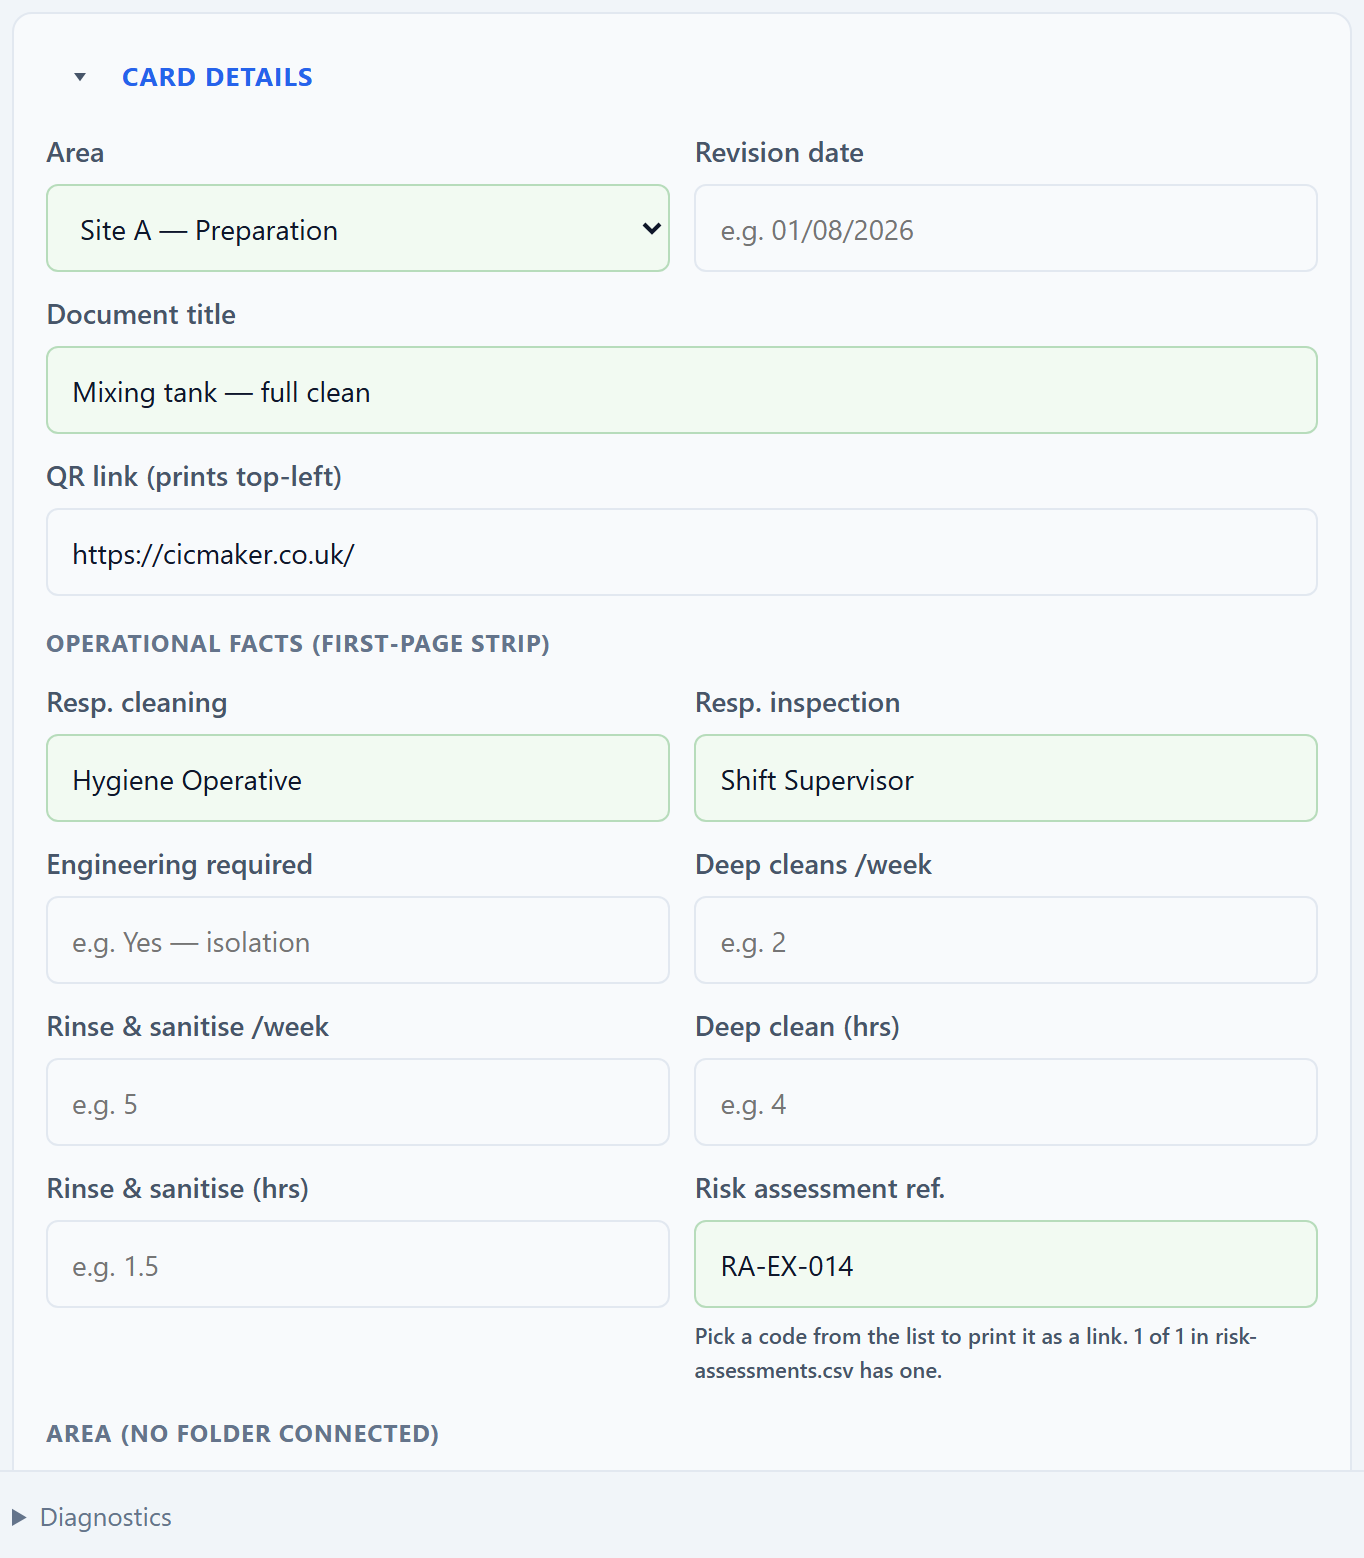
- Area — picked from
areas.csv. It sets the site and area printed in the header, and the header’s colour. With no folder connected there is noareas.csvto pick from, so instead you get a box to type an area name into and six colour swatches — red, orange, yellow, green, blue, purple — to choose the header band yourself. Connect a folder and those two controls disappear: a connected folder is the controlled source, and the name and colour come from it. - Risk assessment reference — the code of the risk assessment that governs this job. It prints once, at the foot of the card, in the list of references. Leave it empty and nothing prints there at all.
- Document title — what the card is called, in big letters at the top. For example Mixing Tank 3 — Full Clean.
- QR link — paste a web address and a QR code is generated in the top-left corner of the printed card. Only
httpandhttpsaddresses are accepted. - Operational facts — the strip under the header: who cleans, who inspects, whether engineering has to isolate, how often the clean happens and how long it takes.
- Identification images — the logo (top-left) and a cover photo of the equipment (top-right).
Sections
A card is a stack of sections. Press + Add block to add one.
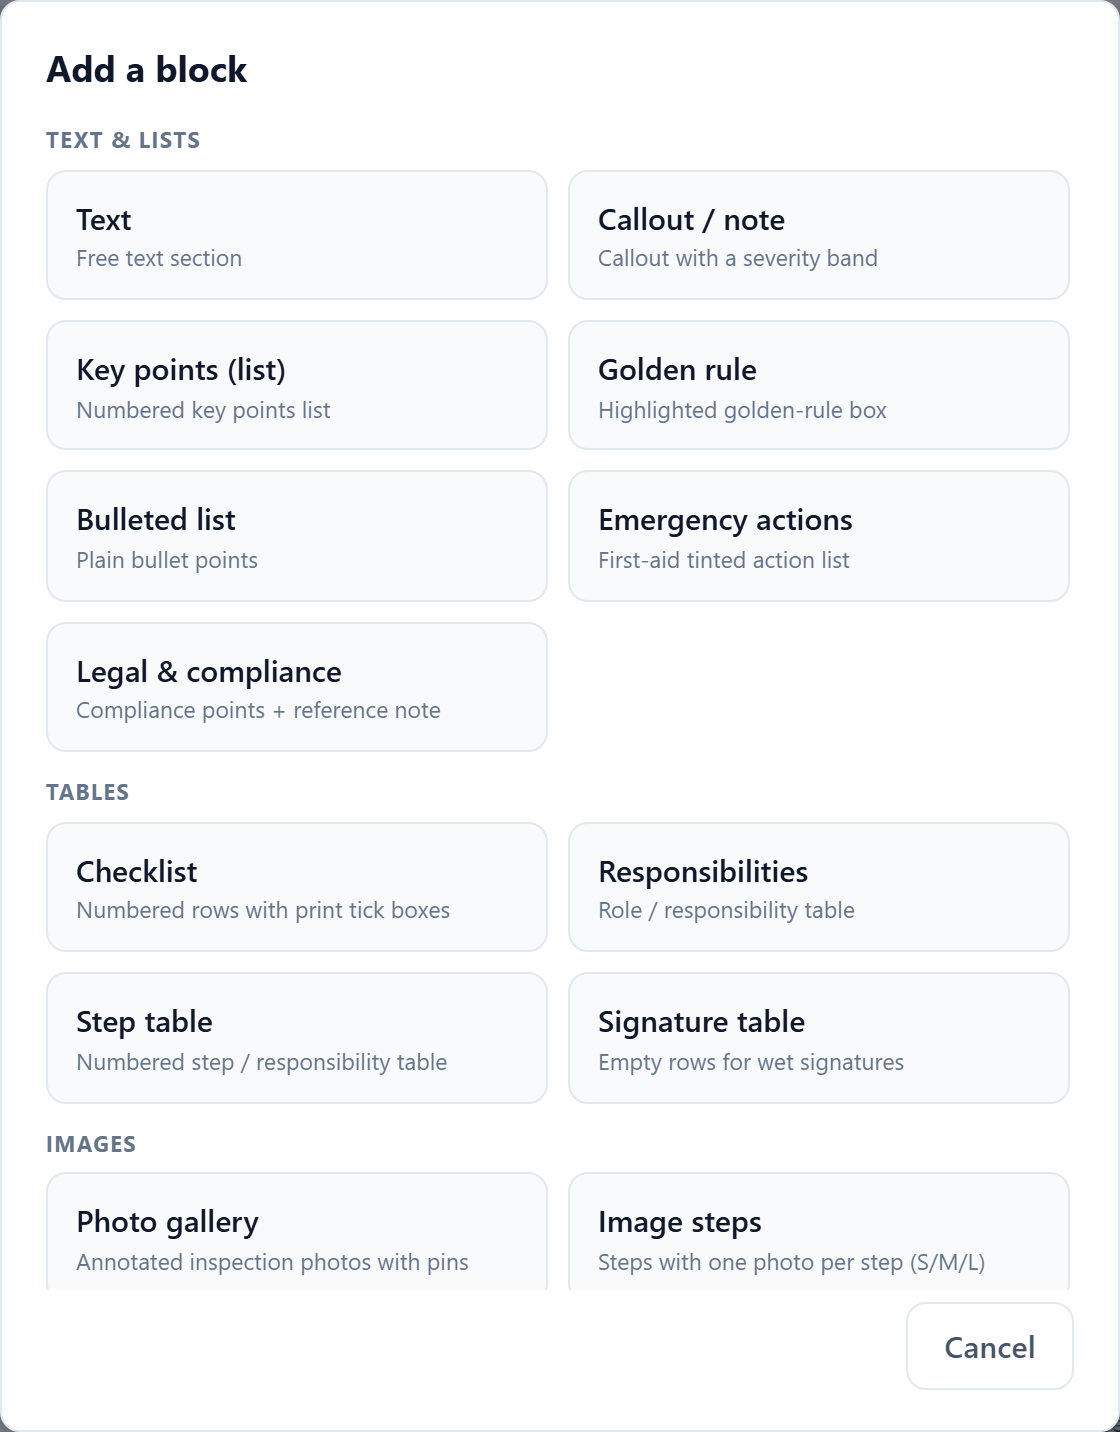
A new card starts with five sections already in place: a callout at the top, the chemical panel, the method steps, a safety block and the colour-code legend at the foot.
Three of those five cannot be deleted — the chemical panel, the method steps and the colour-code legend. You can hide them and you can move them up and down, but their × button is switched off. The callout and the safety block are ordinary sections: take them out if a card does not need them.
A brand-new card opens with every section folded shut, including card details and the sign-off, so you start with the shape of the card in front of you rather than a wall of empty boxes. Click a section name to open it. A card you come back to is different on purpose: reopen a half-finished card, or restore unsaved work after a crash, and the sections are open, so you can see what is already filled in without unfolding twenty of them.
| Section | What it is for |
|---|---|
| Text | A plain paragraph or two. Use it when nothing more structured fits. |
| Callout / note | A tinted box with a severity band — Information, Warning or Caution. Use it for the one thing somebody must read before they start. |
| Key points (list) | A numbered list of short points, laid out in columns. Good for “check these five things”. |
| Golden rule | A single highlighted rule with a chip beside it. One per card, or it stops being golden. |
| Bulleted list | Plain bullet points. |
| Emergency actions | A red-tinted list. What to do if something goes wrong — a splash, a spill, a machine that moves. |
| Legal & compliance | Compliance points with a reference note underneath. |
| Checklist | Numbered rows, each with an empty square printed beside it for a pen tick. Use it for post-clean verification. |
| Responsibilities | A two-column table: role, and what that role is responsible for. |
| Step table | A numbered table of step and responsibility. Use it when the method is better as a table than as a list. |
| Signature table | Empty rows for wet signatures. Set your own column headings and how many rows. Use it as a clean record on the wall. |
| Photo gallery | Photographs side by side, each with a caption and numbered pins. See photos and pins. |
| Image steps | Steps with one photograph each, at small, medium or large size. Use it when a picture explains the step better than words. |
| Custom section | Your own label-and-value rows, with an optional picture per row. Allergen zone, water point, drain point — whatever your site needs. The labels can come from custom-fields.csv. |
| Additional SOPs | Up to six QR codes linking to related procedures, each with a number and a label. |
| Electrical panels | Which panels to isolate and which parts need covering before wet cleaning, with photographs. |
| Fault reporting | A QR code and equipment ID for raising a maintenance request. |
| Colour-code legend | Your utensil colour chart from colourcode.csv. Always last on the page. |
Working with a section

From left to right: the little triangle folds the section away in the editor (it does not change the printed card). The name opens and closes it. Then, on the right:
- Crosshair — scrolls the preview to this section, so you can see what you are editing.
- Up / down arrows — move the section within the card.
- Crossed-out eye — hide the section from the printed card without deleting it. What happens to a hidden section when the card is exported is covered under printing and exporting; read that before you rely on hiding.
- × — remove it. Undo brings it back.
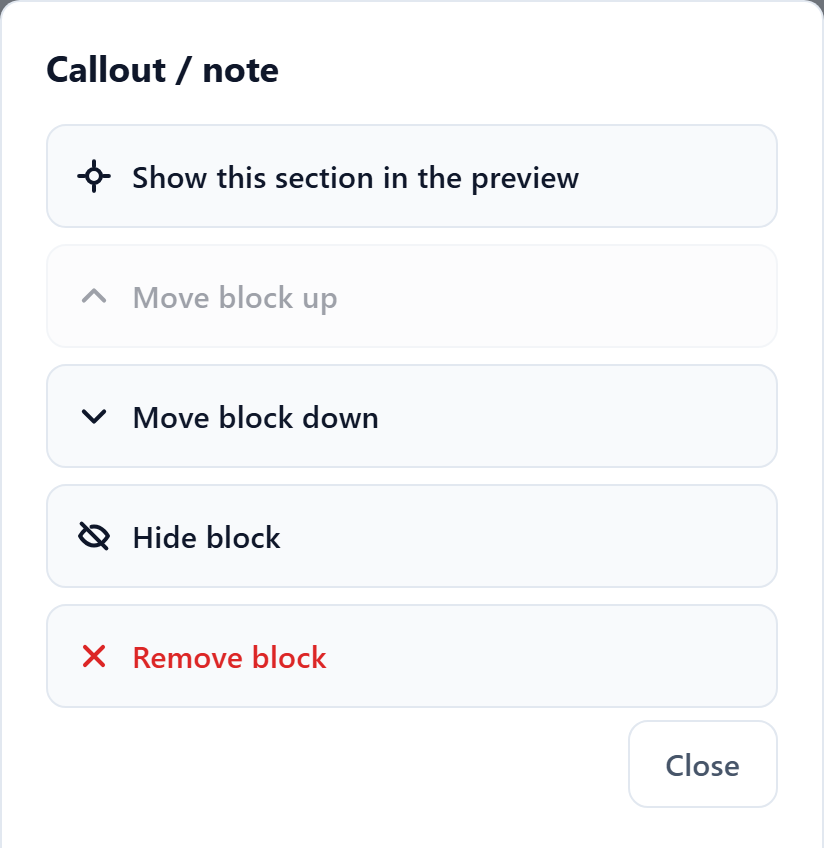
- … — on a narrow screen, the same buttons in a pop-up sheet.
Method steps
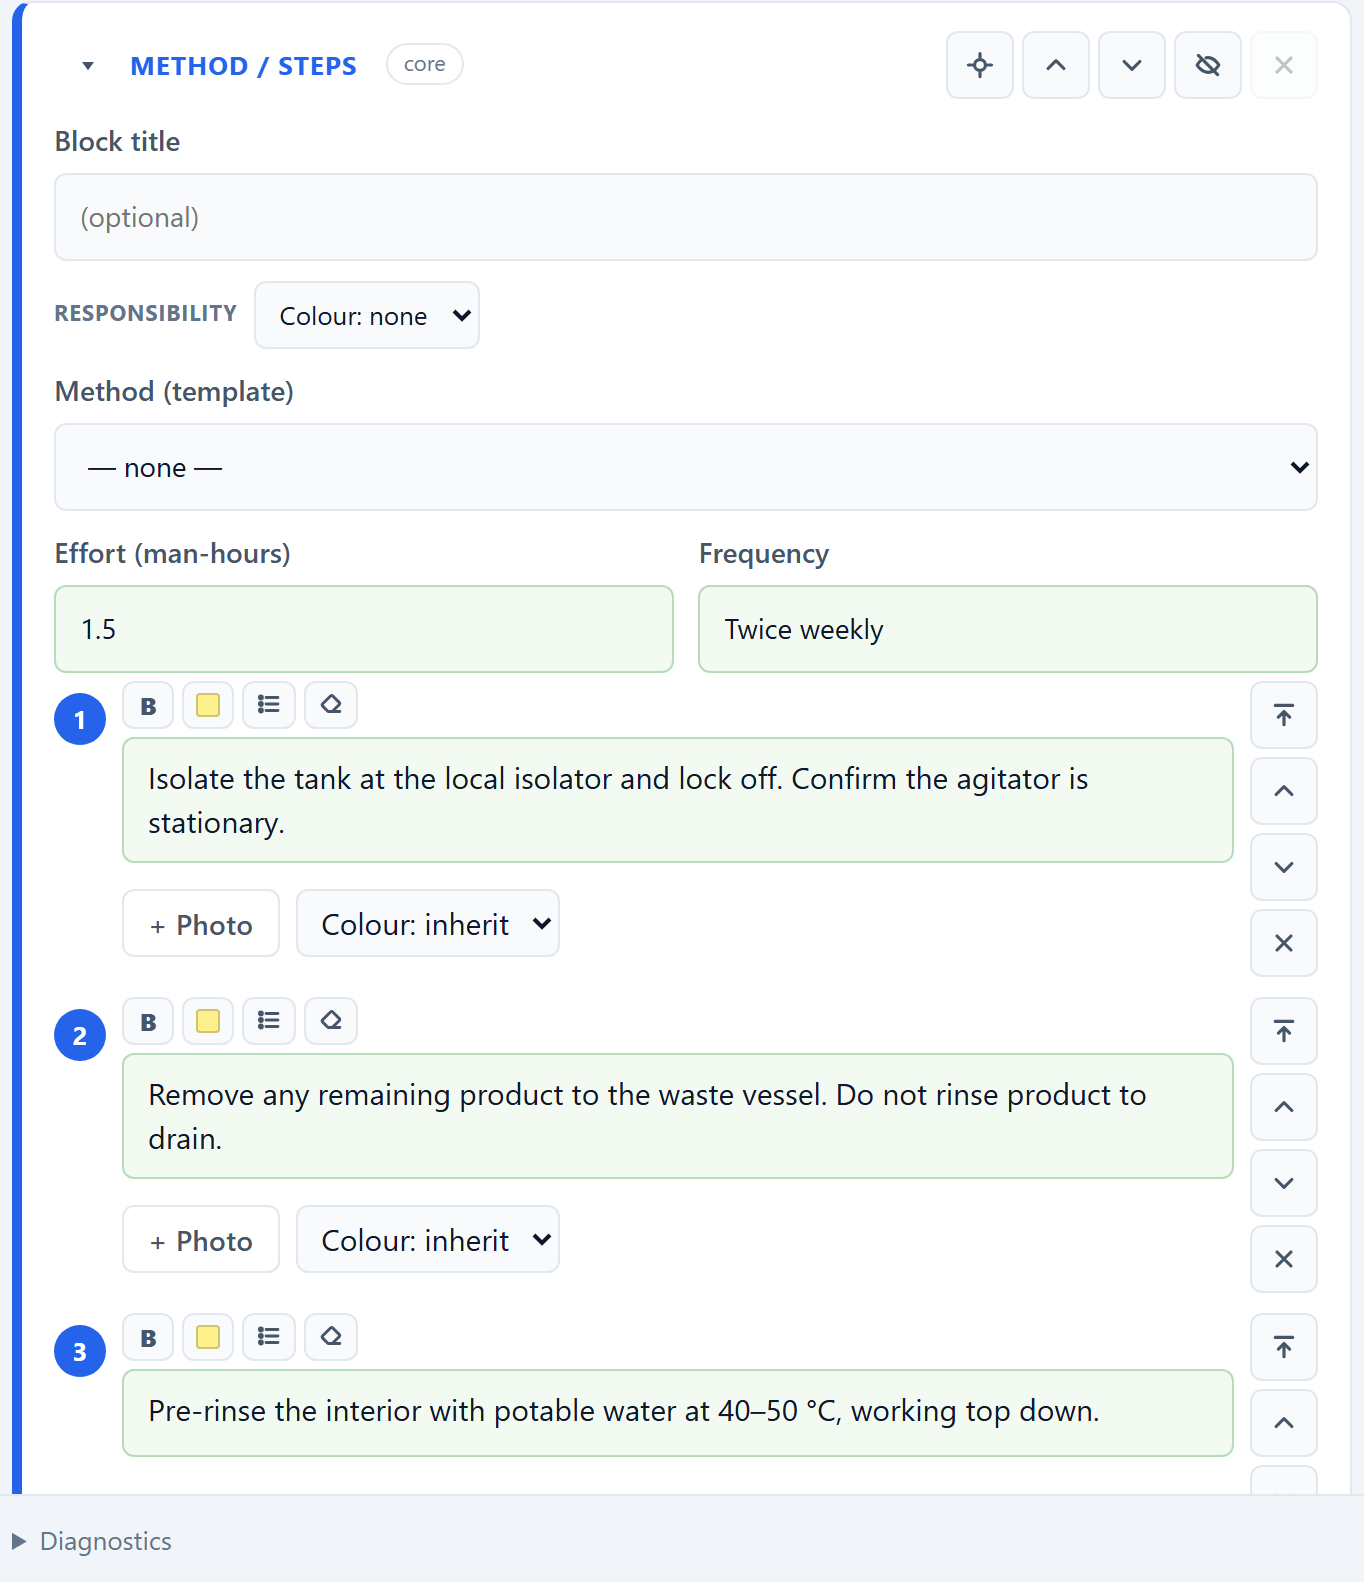
Choose a method from methods.csv. The steps themselves are yours to write — the app offers no ready-made opening steps, whatever step-starters.csv contains (see the note on that file above).
Effort and frequency print as a small line above the steps — 1.5 man-hours · Twice weekly.
Each step can carry photographs and its own responsible role. Press + Step at the bottom to add another.
Bold, highlight and bullets
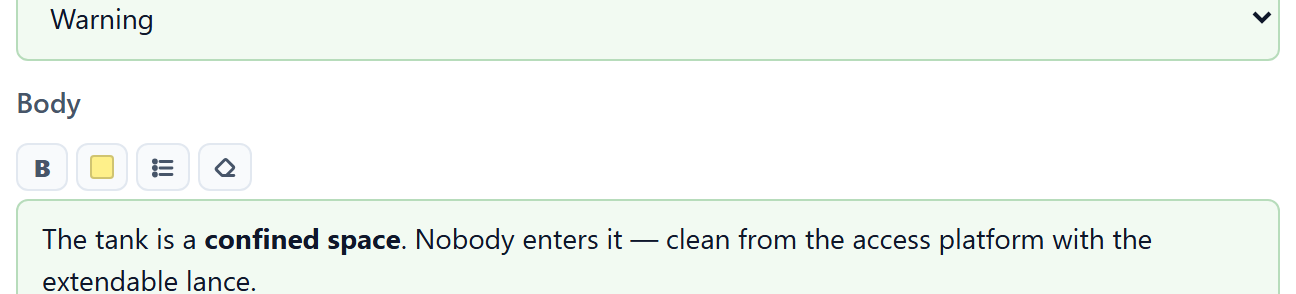
Select some words, then press:
- B — bold. Use it for the numbers that matter: a chemical strength, a contact time, the word never.
- The yellow swatch — highlight. One colour only, on purpose. Two highlight colours on a shop-floor document stop meaning anything.
- The list button — turn the lines into bullet points.
- The last button — strip all formatting back out.
These work in step text, safety notes, callouts, list items and table cells. They print exactly as you see them.
7. Chemicals, tools and icons
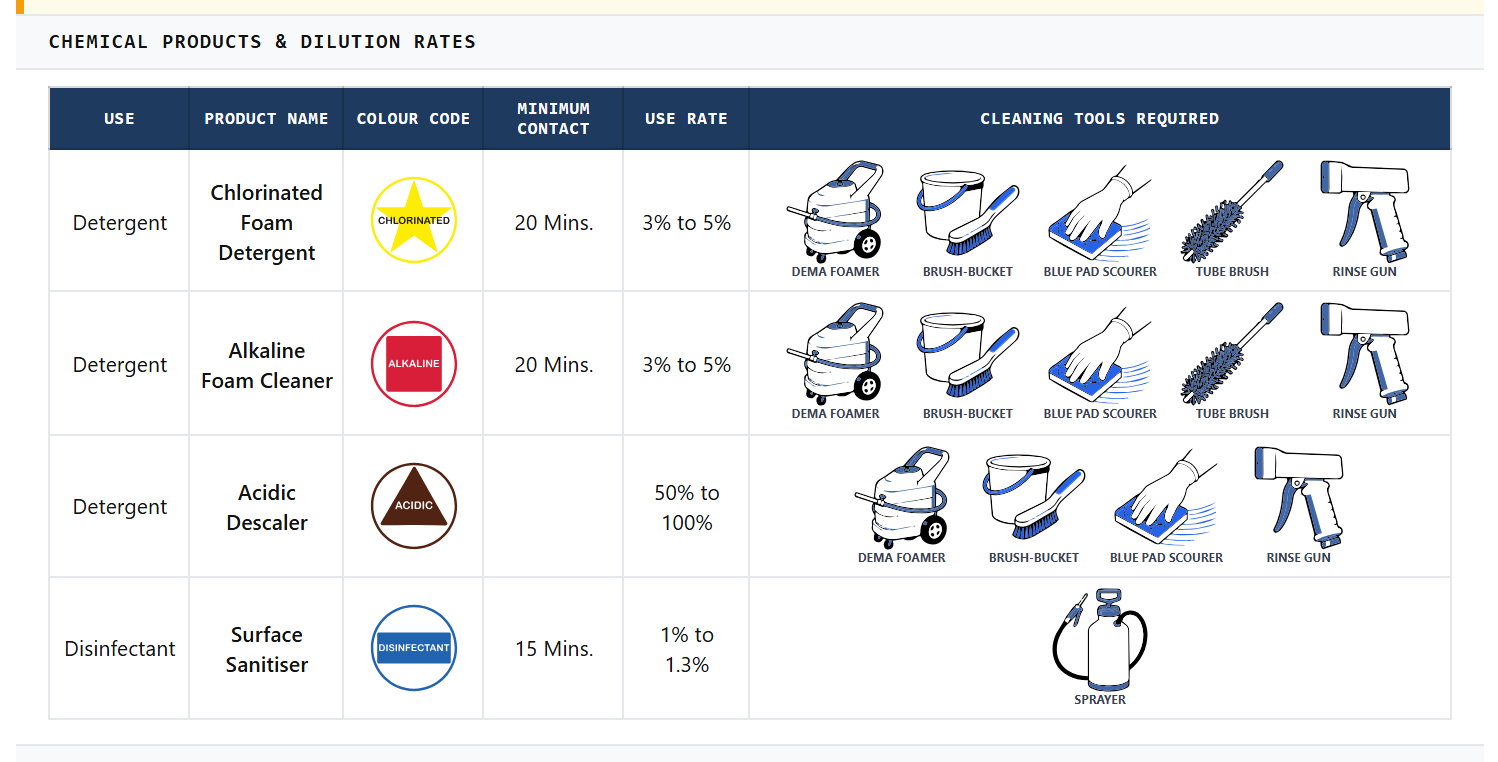
The chemical panel is usually the first thing anyone looks at, so it prints as a proper table.
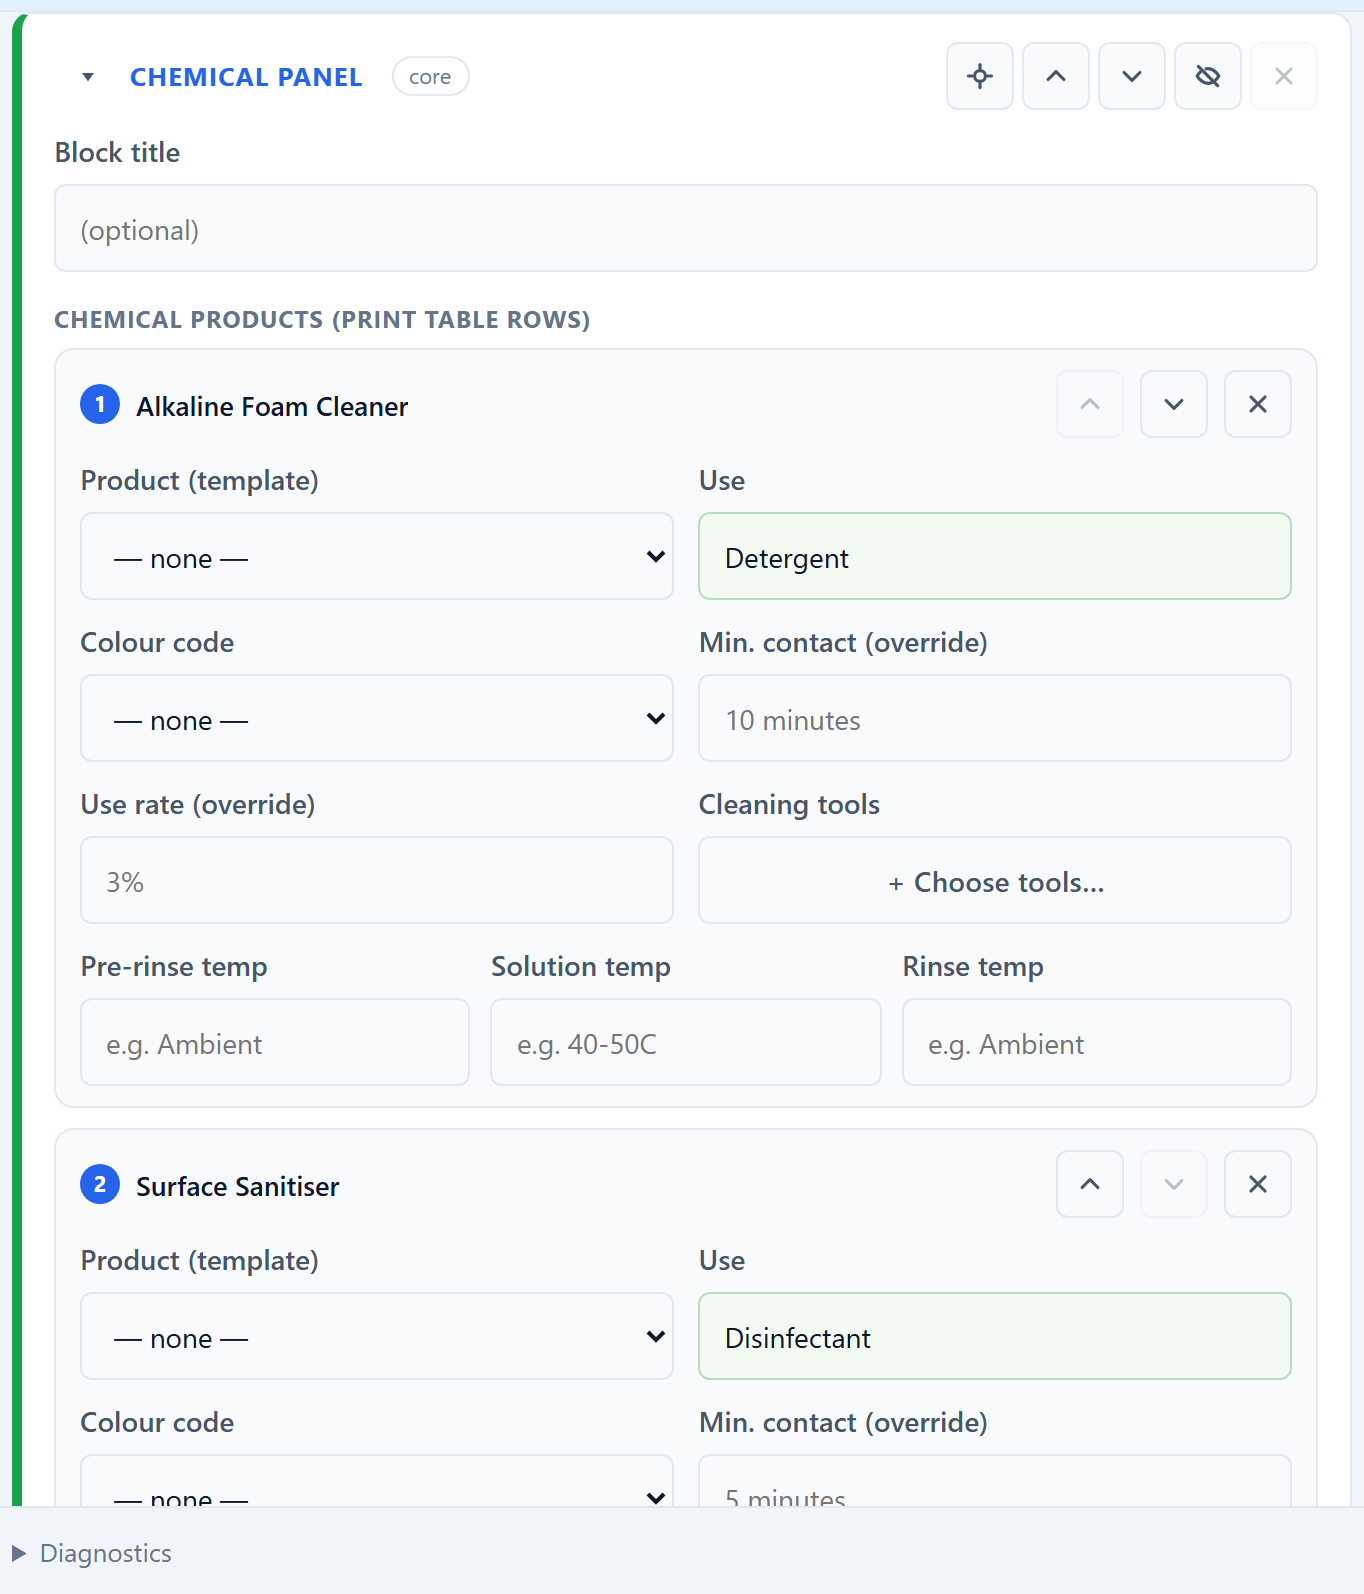
Press + Add chemical for each product. Pick it from chemicals.csv and its class, contact time and use rate are filled in for you. You can override the contact time or the rate on this card only without touching the template.
The two kinds of colour
These are easy to mix up, so:
- The colour code column on a chemical row is the chemical class — Alkaline, Acidic, Caustic, Chlorinated, Disinfectant or Neutral. It prints as the round badge.
- The utensil colour code is your red/blue/green regime. It prints as the legend at the foot of the card, and it shows up in the colour of the tool icons you attach.

colourcode.csv.The icon picker
Press Tools… on a chemical row, or Add PPE… / Add controls… in the safety section.
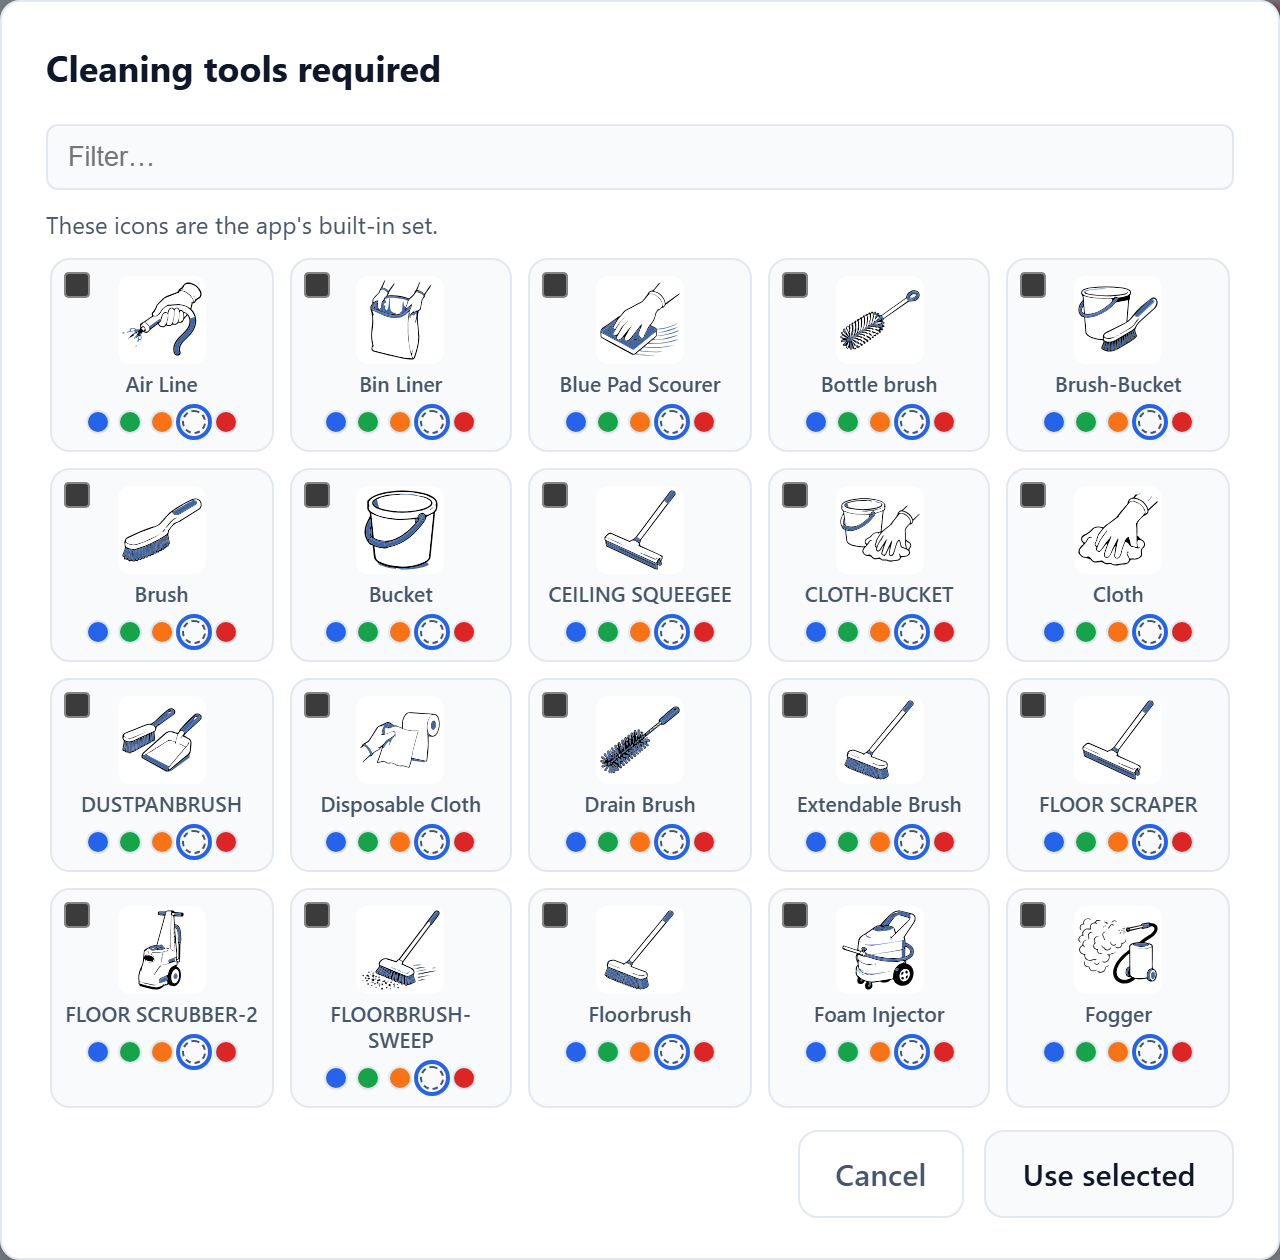
Under most tools there is a row of coloured dots — grey, blue, green, orange, red, white. That is the same tool drawn in each utensil colour. Pick the dot that matches the colour code for that job and the printed card shows a red brush, not a generic one. An operator can then match the picture to the rack on the wall.
You can add your own icons too: drop an SVG, PNG or JPG into one of the five folders under 03_Assets/01_Icons/ — ppe, tools, controls, chemicals or other. The filename becomes the caption. Those five groups are fixed, so a folder of your own alongside them is not picked up; inside a group, the only subfolders the app reads are the colour ones (plain, blue, green, red, orange, white and the rest of the colour names).
Every tile prints its name underneath the picture — PPE, controls and cleaning tools alike. For PPE and controls that name is the caption column of defaults-ppe.csv or defaults-controls.csv, so you can change the printed words without touching the artwork; cleaning tools have no such list, so theirs is the filename. Artwork with words already drawn into it will say the same thing twice — use a plain picture, or edit the caption.
One rule worth knowing if you are replacing artwork: a drawn SVG wins over a flat photo of the same name. The picker builds one tile per name, and where both exist the tile shows the SVG. The icon set that ships with CIC Maker was thinned on exactly that rule in August 2026 — the flat images left in it are the ones the new artwork has not reached yet.
Key inspection points
At the bottom of the chemical panel you can list the points that must be checked after the clean. They print in a numbered strip under the table — the first thing a supervisor signing the card looks at.
8. Photos, cropping and pins
Press + Photo on a step, or add a Photo gallery section. Take the picture on your phone, or pick a file.
Cropping
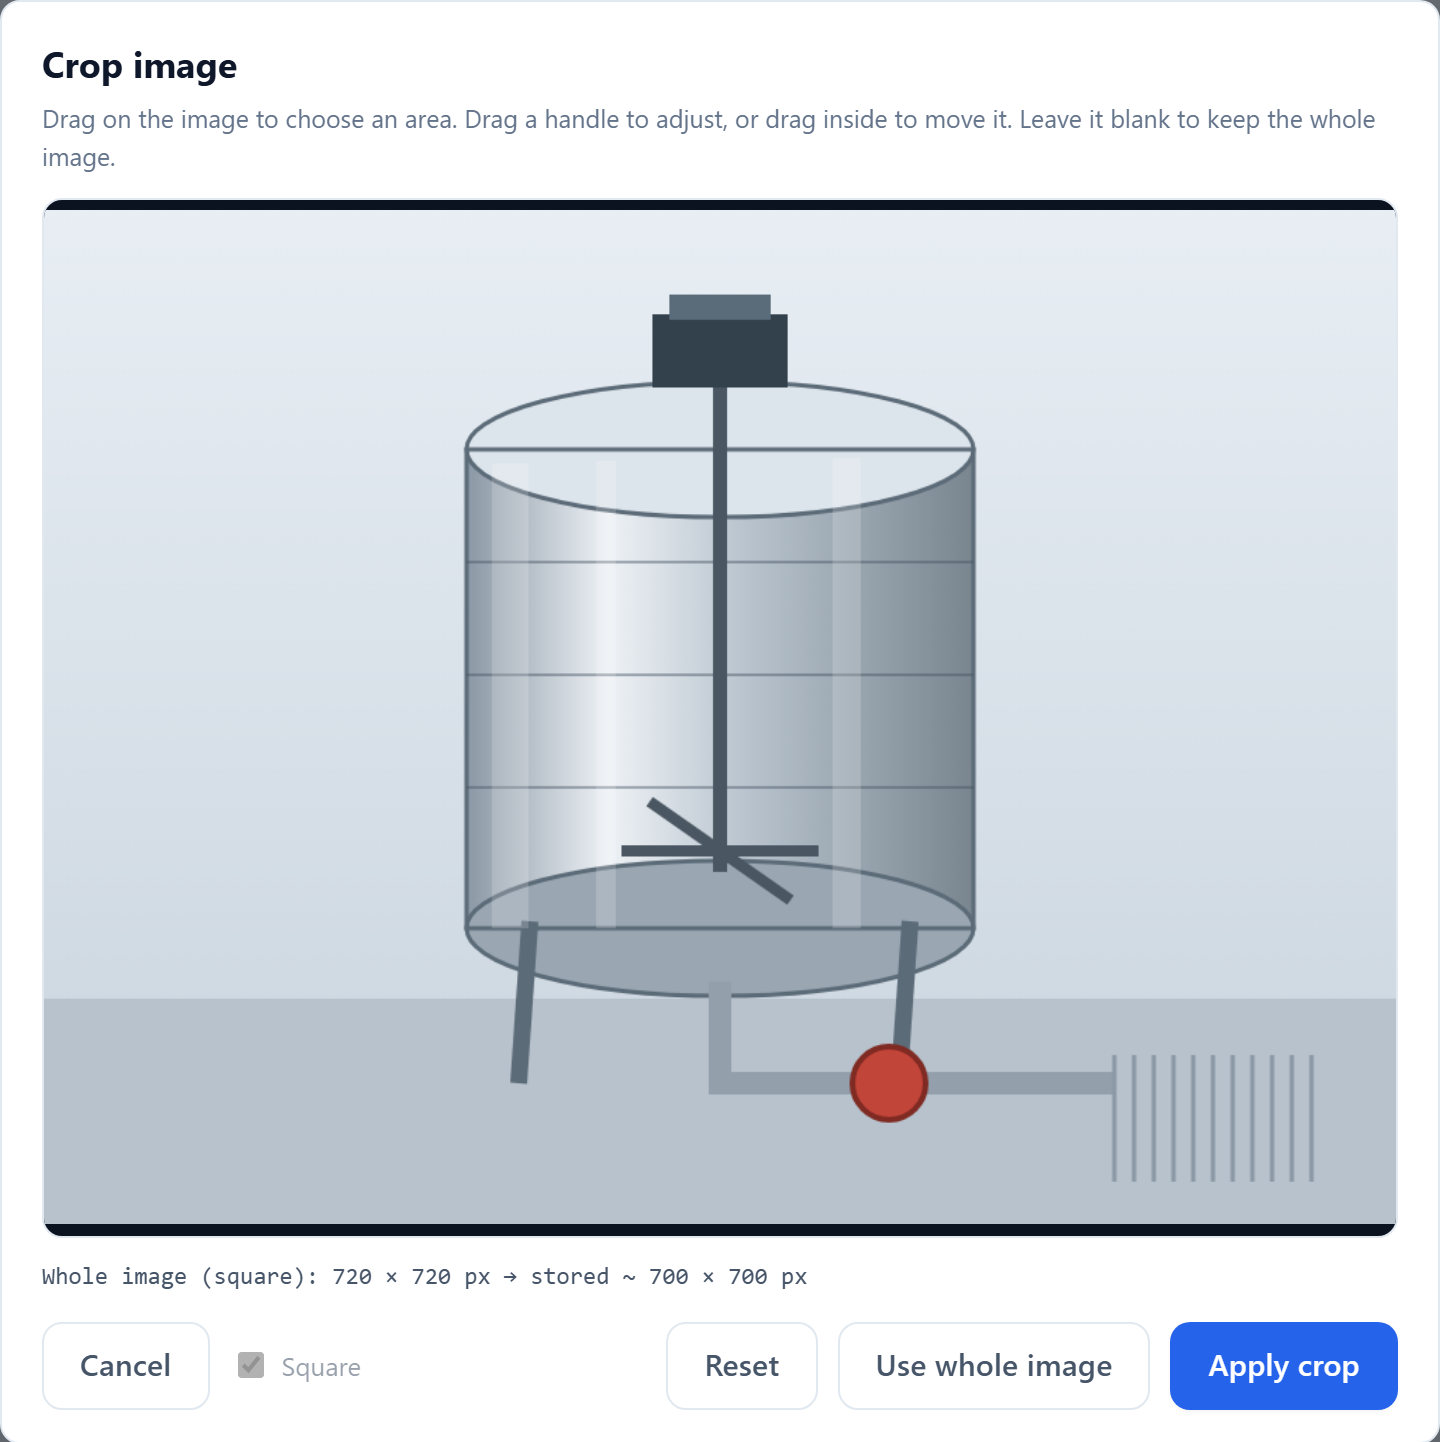
Drag a box over the part that matters and press Apply crop. If the whole picture is the point, press Use whole image instead. Reset clears the box and starts again. Three things worth knowing:
- Square is not a choice you make. The app decides and the tick box shows you which way it went — hover it and it tells you why. Photographs are cropped square, because square pictures line up in the printed grid and mixed shapes leave ragged gaps. Your company logo is the one exception: a logo is usually a wide wordmark that would lose its ends, so it is never squared. It keeps its own shape and is only scaled down to fit the header.
- The line under the picture tells you the truth about size — what you selected, and what will actually be stored. Big photos are scaled down on the way in, so a 6 MB phone photo does not become a 6 MB card.
- All of this happens in your browser. The photo is never uploaded anywhere.
How big a card can get
A card has to stay under 27 MB. CIC Maker will open a file up to 30 MB, and a card is held a little under that on purpose — so one exported on your machine still opens on somebody else’s. A line above the editor shows what your photographs weigh and roughly how big the exported file will be. Under 21 MB it just states the figure; from 21 MB it turns amber and says you are getting close; at 27 MB the tool stops accepting new photographs until you remove one or crop one smaller. A photograph that would take the card past 27 MB is refused before it is saved, and the card is left exactly as it was.
Every photograph sits inside the exported file twice — once for the printed page, once as the copy that lets somebody import the card back — so the file comes to roughly two and a half times the weight of the pictures on it. Around a hundred photographs fits comfortably.
If a card does reach the limit, Export and Download refuse and say so, and nothing is written: no file, no line in the change log. Remove or re-crop a photograph and export again.
Captions and pins
Each photo has a caption box. Say what the reader is looking at, not what it is called.
Press Pins and you can drop numbered markers on the photograph itself.
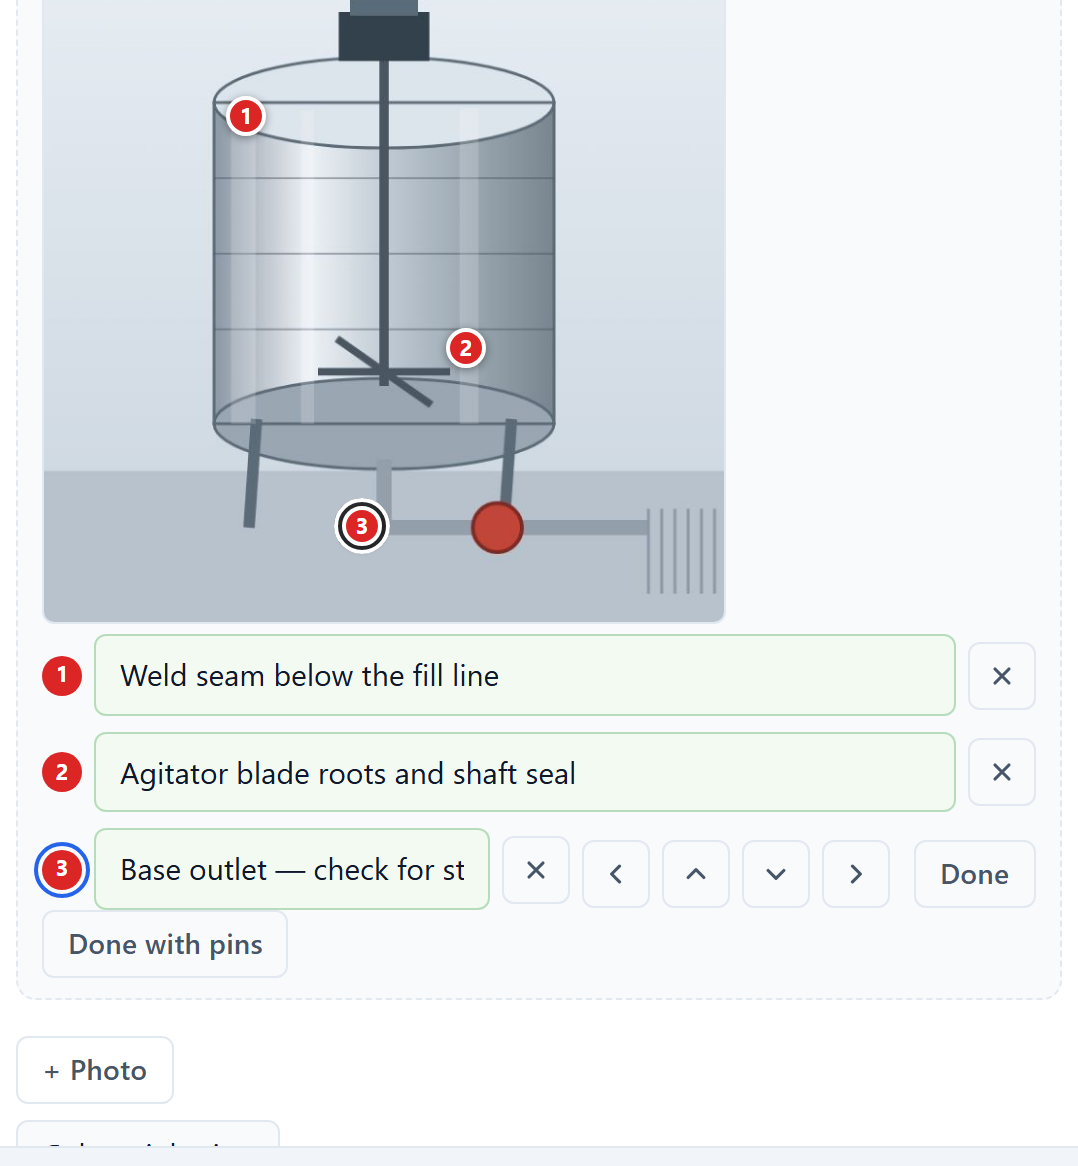
On the printed card the pins appear on the photo and their labels appear in a small table beside it, coded 1A, 1B, 1C for the first photo, 2A, 2B for the second, and so on. That is how you point at a weld seam or a blade root without writing a paragraph about where it is.
Use pins for the places that actually get missed. A photo with twelve pins on it tells nobody anything.
9. Responsibilities and their colours
The method steps section, and each individual step inside it, can be assigned to a role. Each role has a colour, set in responsibilities.csv.
Nothing is tinted until somebody picks a role. A new card prints plain, and so does a step nobody has assigned. That is deliberate: a colour that arrives on its own says nothing, and this one is meant to be a decision a person made.
The tint belongs to the method steps and nowhere else. It shows on the printed card as a colour down the left edge of the step, so an operator can see at a glance which steps are theirs. The chemical panel and the other sections are never tinted, even on an older card that was saved with a role on them. A chip strip near the top of the card — the legend — names every role the card actually uses, with its colour. The strip opens with the words Cleaning step responsibility, so a reader who has never seen one of these cards knows what the coloured dots beside it are for. Those words translate with the rest of the card.
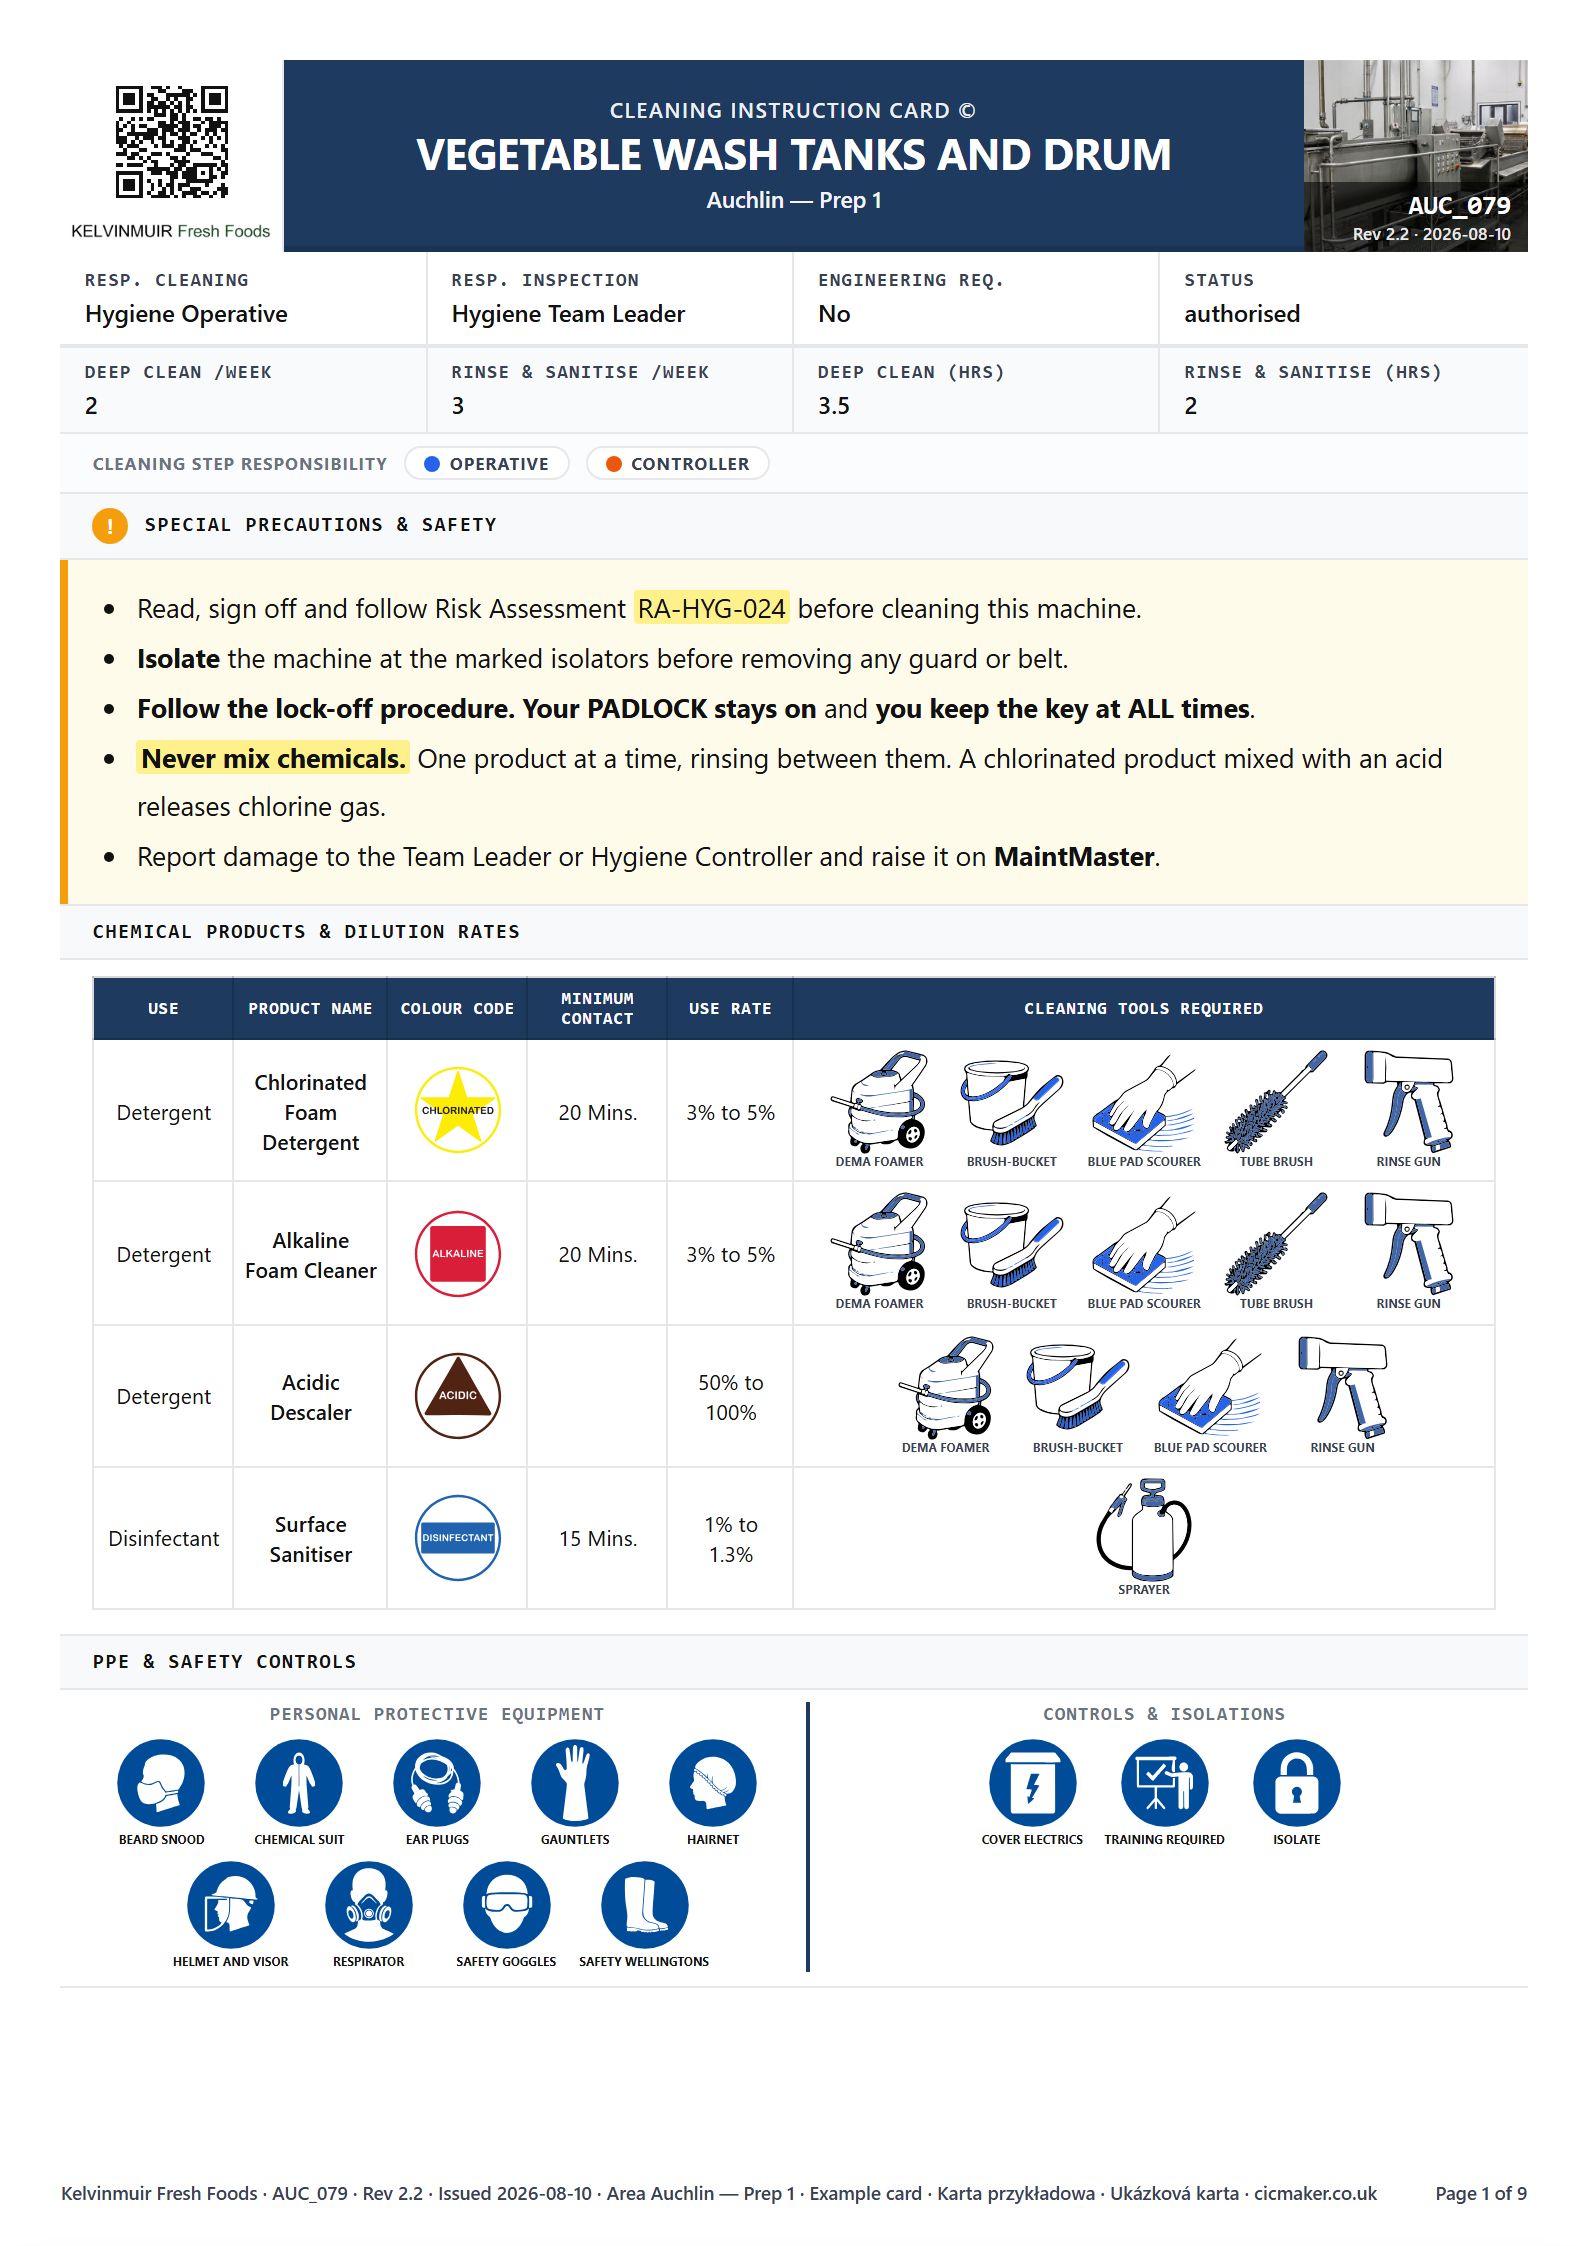
Two more things print near the bottom of a card and are often confused with each other:
- The role legend (near the top) says who does what on this card. It only lists roles that are actually used.
- The colour-code legend (right at the bottom) says what the utensil colours mean at your site. It is the same on every card and comes from your template.
If you want the roles spelled out in words as well, add a Responsibilities section — a plain table of role and duty.
10. A second language
A card can carry more than one language, and the exported file gets a language switcher at the top. The reader picks their language and the whole document changes in place.
Adding one
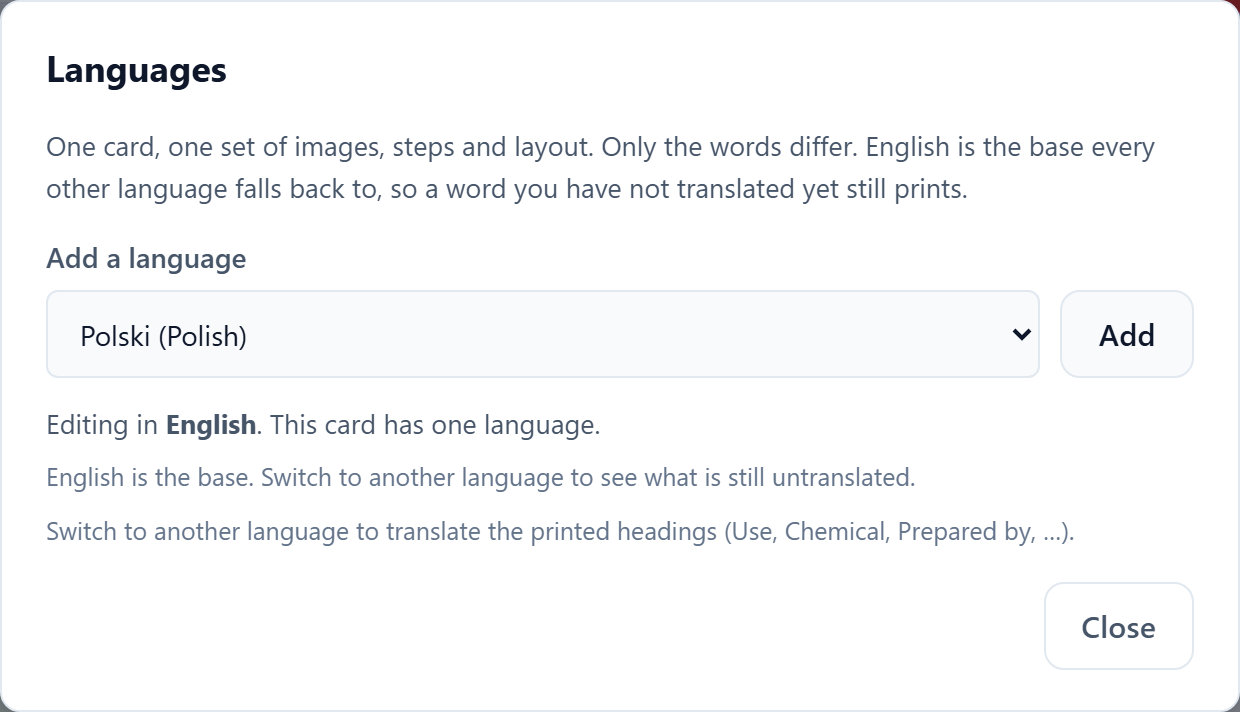
English, Polish, Romanian, Russian and Czech are offered.

Editing in the other language
Switch the toolbar dropdown to the other language and the editor now shows that language’s version of every text field. Type the translation in. Anything you leave blank falls back to English, so a half-translated card still prints properly — it never prints a blank.
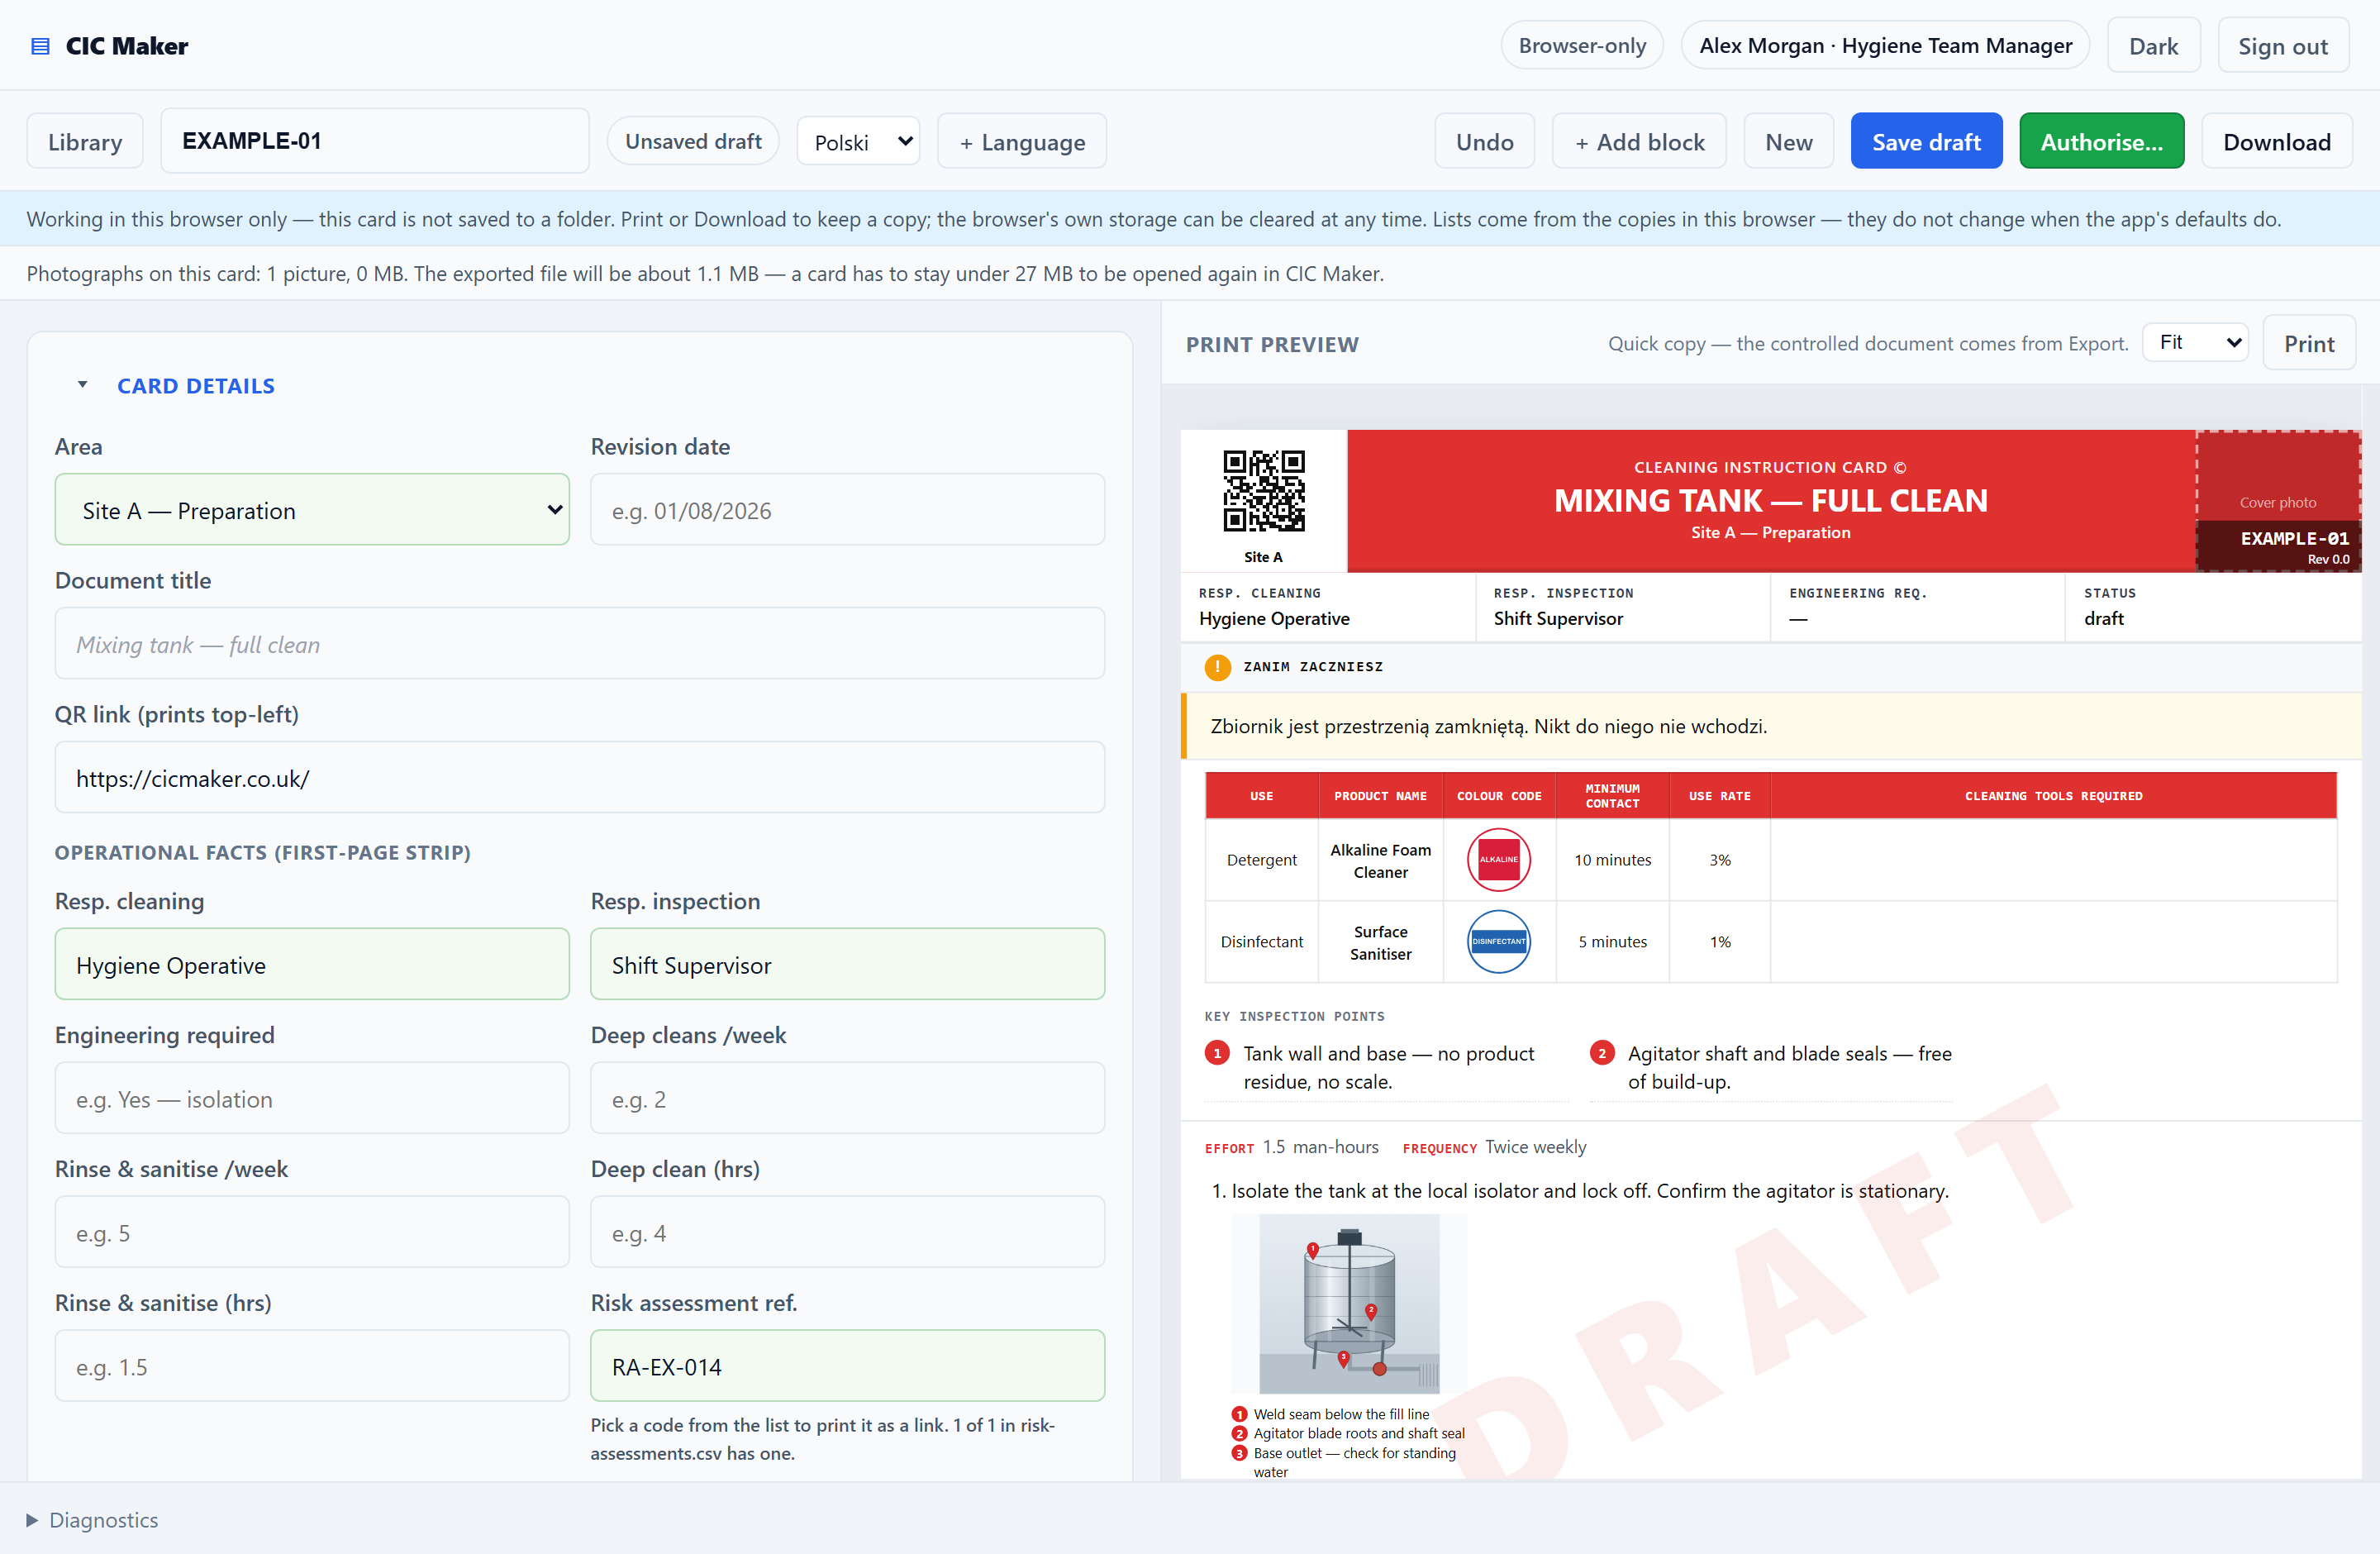
When you change the English afterwards
Somebody edits a step in English three months later and the Polish under it goes quietly out of date — still printing, still looking finished, now saying something the English no longer says.
So the card remembers which English each translation was made from. Change that English and the translation is marked needs re-check: a violet double edge on the field, and a count in the + Language dialog beside Still in English. Retype the translation and the mark clears. If the translation still stands as it is, press Mark all as checked and the list empties.
The fields a card keeps in one language — the document title, equipment and chemical names — are greyed out while you are editing in another. If one is typed into anyway, nothing is saved and the tool says so, then puts the field back to what the card holds.
Two honest limits. It only notices changes made since this was added, so older translations read as not checked rather than current. And the tracking lives in the saved card, not the exported file, so a card handed over and re-imported arrives unchecked — the safe direction to be wrong in.
What does not translate, and why
Some things stay in one language on every copy. This is a rule the tool enforces, not something you can forget to do.
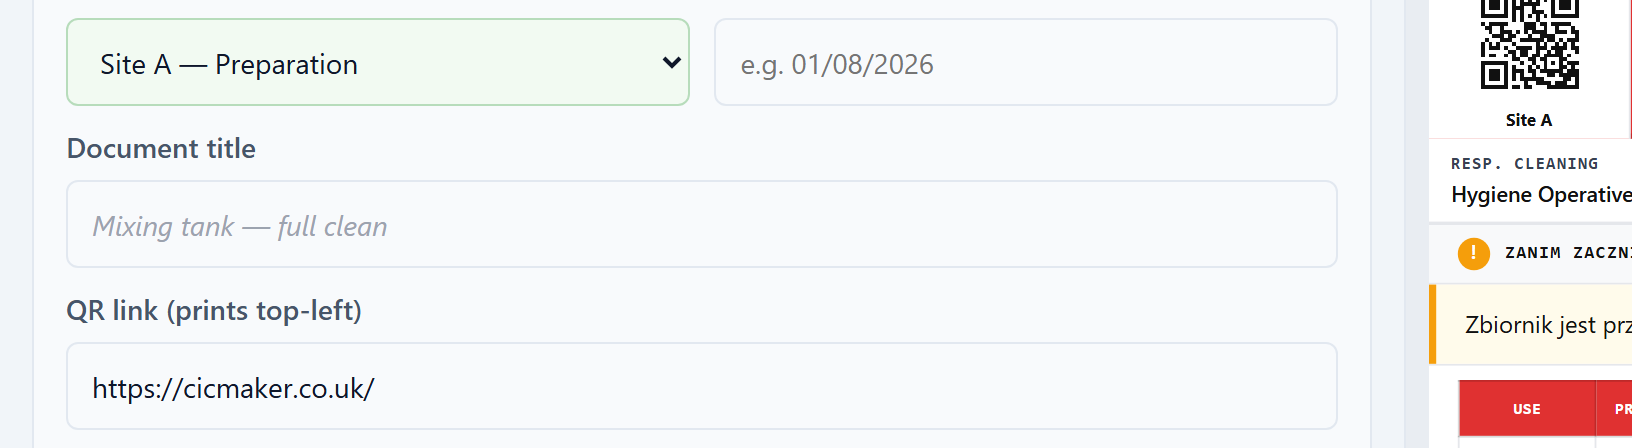
- The card’s reference and its name. A card is asked for, filed and searched for by name. If the name changed with the language, two people would be talking about two different documents.
- Chemical names and codes. The drum on the shelf says Alkaline Foam Cleaner. If the card says something else, the operator reaches for the wrong drum. This is the single most important one.
- Site names, area names, equipment IDs, SOP numbers, risk assessment references. They are labels on real things, not words.
- Version numbers and dates. Digits.
Everything else is translated: step text, section headings, safety notes, key inspection points, pin labels, photo captions, list items, table cells, the responsibility words, the utensil colour names, and every fixed label the document prints, right down to Page 1 of 4.
One gap, stated plainly. Three cells on a chemical row — what it is used for, contact time and dilution rate — are printed as translatable text, but there is no control anywhere in the editor for typing their translation, and they never appear on the Still in English list. On a card written here they print their English on every copy. That is a missing feature, recorded rather than quietly left; whether to build the control or to stop marking those cells translatable is a decision for the owner.
The rule is applied by looking at what kind of field it is, not by keeping a list of words. That matters because it means a section type added next year comes out right without anybody remembering to update a list. When the rule is unsure, it treats the text as content and translates it — the safe failure is translating something you needn’t, not handing a Polish operator a chemical code that does not exist.
Two per-card values are worth mentioning because people notice them: the Effort and Frequency you type into the method block are stored once and print as typed, in whatever language you wrote them. If your card is bilingual, keep those two short and neutral.
The utensil colour names and the responsibility words are translated in the template, not on each card. Add a column called name_pl, description_pl or label_pl beside the English one in colourcode.csv or responsibilities.csv. Do it once and every card in the estate gets it. Use the two-letter language code: pl, ro, ru, cs.
11. Authorising a card
A card is a draft until you authorise it. A draft prints with a large diagonal DRAFT watermark across every page, so a draft can never be mistaken for the real thing on a wall.
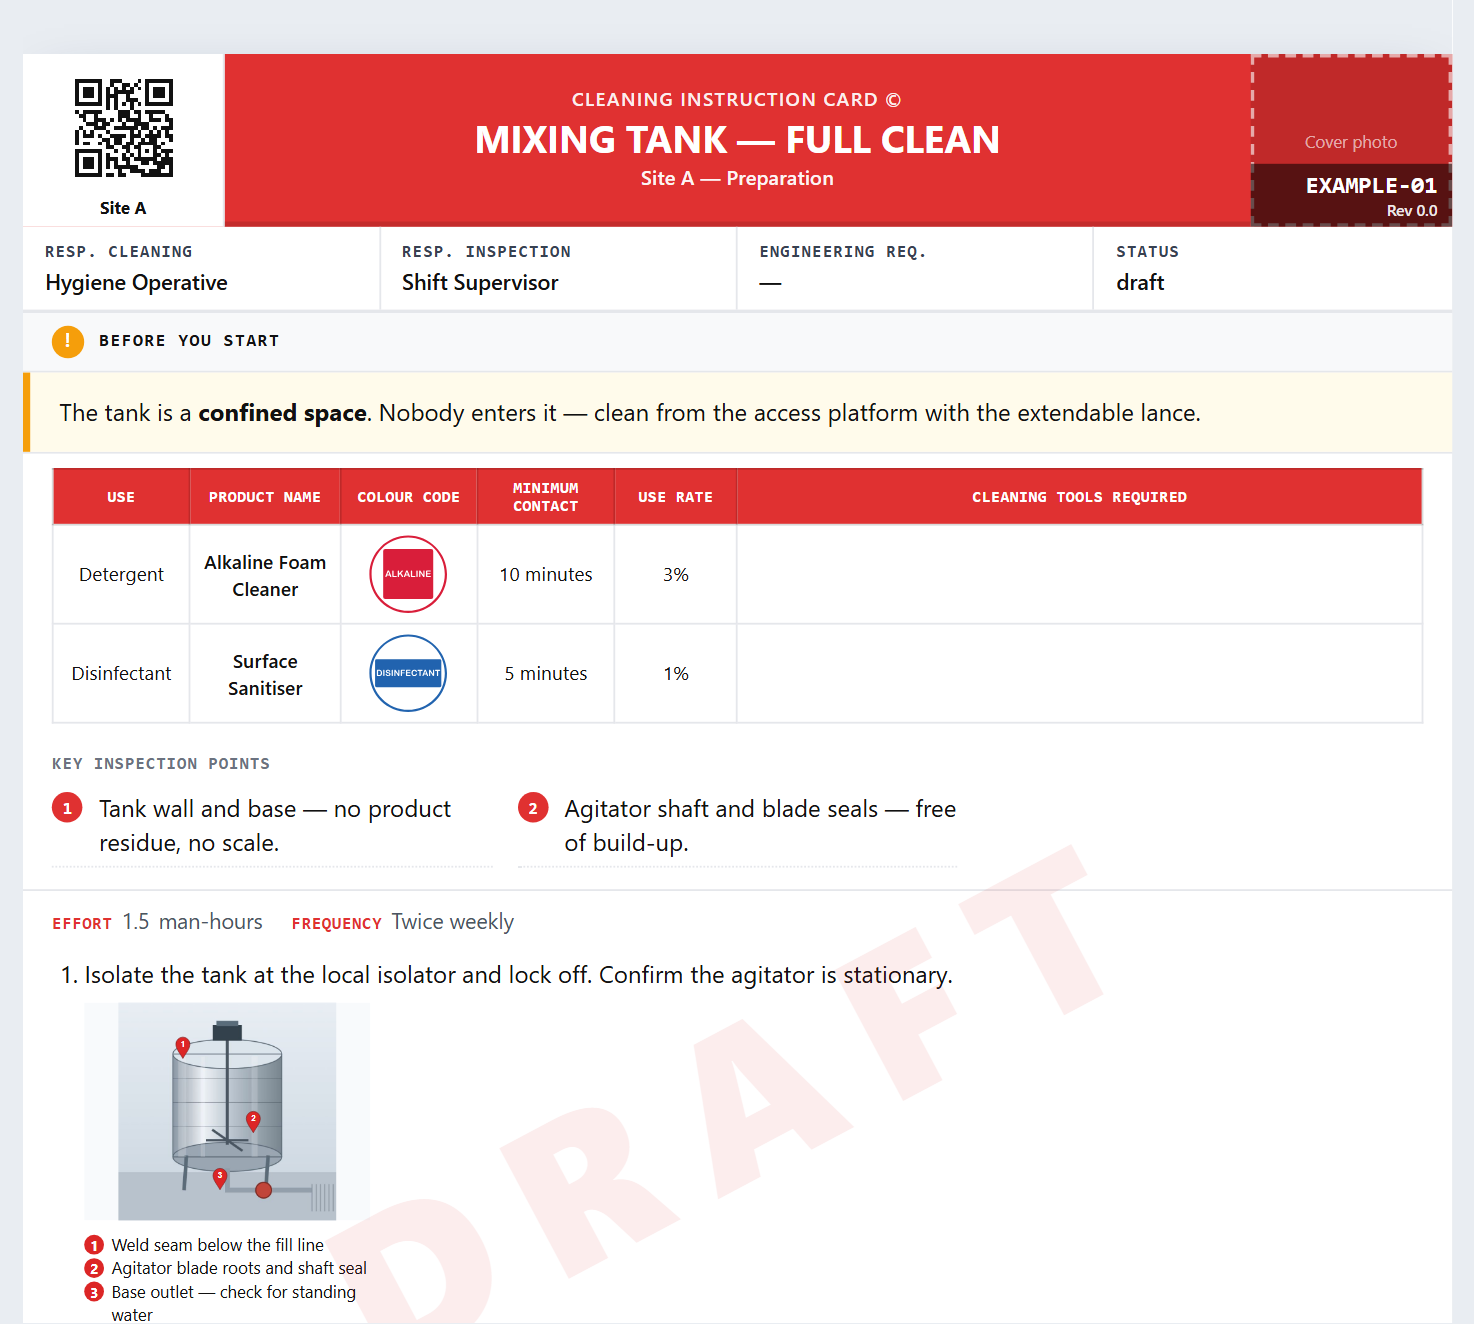
Press Authorise…. The tool checks the card is complete first, and tells you exactly what is missing if it is not.
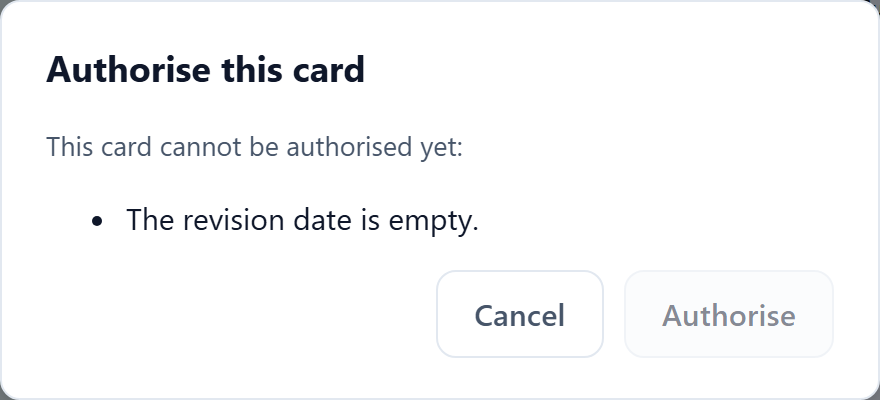
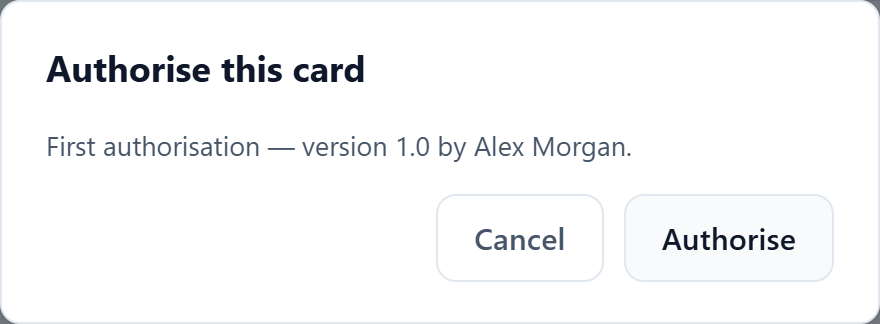
Authorising does four things: it stamps the version number and the date, records who authorised it, removes the DRAFT watermark, and writes the authorised copy into 05_Cards/. That copy — not the draft — is what exports.
Editing an authorised card
Open an authorised card and edit it, and you start a new draft alongside it. The authorised version stays exactly as it is until you authorise the new one. The instruction on the factory wall never changes underneath you.
What follows the template, and what is frozen
There is a deliberate exception, and it is worth knowing about. The steps, the chemical, the contact time, the PPE, the safety notes — everything the card tells you to do — belongs to the card and is frozen the moment you authorise it. A handful of things do not belong to the card at all. They belong to the site, like your company logo, and they are read from the template files every time a card is opened or printed:
- the area colour and the area and site names printed in the header — from
areas.csv; - the company logo — from
03_Assets/02_Branding/; - the utensil colour-code legend printed at the end of every card — from
colourcode.csv; - the footer line that runs along the bottom of every page;
- the safety-data-sheet and risk-assessment links — from
chemicals.csvandrisk-assessments.csv; - the title of the risk assessment, spelled out in the reference list at the foot of the card — also from
risk-assessments.csv, together with its translations. Rename a risk assessment in that file and every card that names it prints the new title, authorised ones included. The reference itself belongs to the card and never changes on its own. - the responsibility role names on the coloured chips — from
responsibilities.csv, with their translations. Rename “Hygiene Operative” there and every card that uses it prints the new name. Which role is on which step still belongs to the card.
The colour-code legend is the one to watch, because it is a hygiene control rather than decoration: change what colourcode.csv says red means, and every card printed after that says the new thing, including cards authorised years ago. That is the point — a site has one colour code, not one per card — but it means the file deserves the same care as the cards themselves.
So if you change Preparation from red to blue in areas.csv, every Preparation card turns blue — including ones authorised last year. That is on purpose. The colour is a hygiene-zone signal that people act on, and a wall of cards still showing a band the site has stopped using is exactly what a zone colour exists to prevent. There is no way to pin one card to a colour of its own; if you need that, the card belongs in an area of its own.
Printed copies already on a wall are paper: they keep whatever colour they were printed with. Re-print after a livery change and the new colour comes with it, with no new version and no new authorisation, because nothing the card says has changed.
The change log
Every authorisation, rename, archive, restore, import and export is written to 07_Log/<REF>.jsonl, one line per event, with the date, the action and your name. It is append-only — nothing is ever rewritten or removed.
Saving a draft is not one of them. A draft is working notes, not document history, and a log full of "saved, saved, saved" would bury the events an auditor actually came for. The log begins when you authorise.
The act and its log line arrive together, or neither of them does. If something goes wrong part-way through — the disk fills, the file is locked by a backup or antivirus program, the network drive drops — the operation is never left half-done. It is either finished or put back, and you are told which:
- If it can still be completed, the app completes it and says so. That can happen on the next thing you do, so an act you were told had failed may turn out to have gone through — the message will tell you.
- If it cannot, every card, photograph, exported file and log line it touched is restored to exactly what it was before you pressed the button, and the app tells you it was undone. Undoing never reaches past its own work: if a file has been changed by somebody else on the shared folder since, the app leaves it exactly as it is and takes the third route below instead.
- If it can do neither, it stops, sets the record aside for review in
07_Log/, and tells you the folder needs attention rather than guessing.
You will not find an authorised card the log has never heard of, or an export with no export line beside it.
Beside it the app keeps <REF>.CHANGE-LOG.md, the same history written out in plain readable form. That is the file to open, or print, when an auditor asks how a card got to where it is.
12. Printing, exporting and importing
Printing

Press Print, then in the print dialog choose A4, Portrait, default margins, and make sure Background graphics is switched on — without it the coloured header and the tinted boxes come out white.
To make a PDF, choose Save as PDF as the printer.
Download
While a card is a draft, the toolbar shows a Download button. It gives you the whole card as a single HTML file, straight to your Downloads folder. The file is named after the card’s reference and its title — CIC-014_Mixing Tank 3-DRAFT.html. The name ends in -DRAFT and the file itself carries the DRAFT watermark, so an uncontrolled copy says so twice.
This is the route out when you have no folder connected.
If the card has any hidden sections, a second button appears beside it: Download with hidden sections. It is the twin of Export with hidden sections and works the same way — see What travels inside the file below before you use it.
Export
Once a card is authorised, Export writes a single self-contained HTML file to:
06_Exports/<Site>/<Area>/HTML/<REF>_<card name>.html
The file is named after the card’s reference and its title — CIC-014_Mixing Tank 3.html — so a folder of forty wall copies can be read by eye without opening any of them. A card with no title yet gets just the reference. Anything a filename cannot legally hold (a slash, a colon, a run of dots) becomes a dash, and a very long title is trimmed to sixty characters.
Change the title and re-export, and the old file goes: the previous copy of that card in the same folder is removed as part of the same operation, so you never get two files that both look current. New one written first, old one removed last, so a failure part-way leaves the folder as it was.
Everything the printed card needs is inside that one file — the images, the icons, the layout, the fonts. Email it, drop it on a tablet, open it on a machine that has never heard of CIC Maker. It opens and it prints the same. It needs no internet connection. (What is not inside it is covered two headings down.)
If the card has any hidden sections, a second button appears beside it: Export with hidden sections. Plain Export is the everyday one and the one to use unless you have a reason not to; the second button is for handing a card to a colleague who should see the hidden parts. The difference is set out two headings down. After the export, the message on screen tells you what the file you have just made contains.
The exported file has a small bar of its own at the top:

Only authorised cards can be exported. That is deliberate: a controlled document should never come from a draft.
The exported card on a phone
A cleaning instruction card is a controlled document, so on a phone it opens as the page — the whole A4 sheet, scaled down to fit the screen, laid out exactly as it is on the wall copy and on a PC. Nothing is rearranged and nothing runs off the side. The trade is that the type is small at that size: pinch to zoom into the part you need, the same as any PDF.
If you would rather have the words at reading size, tap Read in the bar. The card then reflows to the width of the phone: same file, same words, same order, only the boxes move. Tap Page to go back. Printing is unaffected either way — the paper always gets the A4 page.
What travels inside the file, and what does not
The exported file also carries a hidden machine-readable copy of the card. That copy is what lets you import the file back later, and it is why the file is bigger than the page you see.
The ordinary Export and Download buttons leave out anything you hid with the crossed-out eye. Not on the page, and not in the hidden copy — its words in every language and its photographs go with it. The file records how many sections were left out, never what they were. That is what you get unless you deliberately press the other button.
The other button is Export with hidden sections (or Download with hidden sections while the card is still a draft), and it appears only when the card actually has a hidden section. It builds the same document — the printed page is identical, and the hidden sections still do not appear on it — but it keeps them inside the file, so anyone who opens that file in CIC Maker gets the whole card back. It is there for one job: handing a card to a colleague who should see the hidden parts.
What that means in practice: a file made this way contains text that is not on the page it prints. Do not send it to a customer or an auditor — send them the ordinary export. An export made with the second button is marked as such in the card’s log, along with how many hidden sections it carried.
Nothing asks you to confirm any of this. The two buttons say which is which, and the message after the export states what the file you have just made contains.
The rest of the card does travel, including the Prepared by and Authorised by names, positions and dates. Those are printed on the face of the card anyway — naming who wrote a document and who approved it is what a controlled document is for.
Treat an exported card the way you treat any other controlled copy: it names people, and once it is emailed you no longer decide where it goes.
A card belongs to one area, and one export writes one file. If you import a card from somewhere else that was set up with two or more areas, Export refuses and tells you which areas it is carrying — open the card, pick the single area it belongs to, authorise it and export again. It refuses rather than quietly publishing to the first area and leaving the others with no current copy.
Bringing an exported card back in
An exported card is not a dead end. In the library press Import… and choose an exported HTML file, and the card comes back as an editable card — text, photographs, icons and all.
That is how you move a card between two machines, or recover one from an email when the folder is long gone. Everything in the file is re-checked and re-encoded on the way in, so importing a file from somebody else is safe.
Two size limits, and they behave differently. A file carrying more than 200 photographs is refused outright — nothing at all is written, and the message tells you the count and the limit, so export it again with fewer or split the card. But a single photograph too large to bring in (over 6 MB once encoded in the file) is skipped: the rest of the card imports and a warning names that photograph and both sizes. So a card can come in looking complete with one picture missing. Read the warning. A card exported by CIC Maker itself can never hit that second limit — it shrinks every photograph on the way out — so it only happens with a file that came from somewhere else or was edited by hand.
Whether hidden sections come back depends on which button made the file. From an ordinary export they do not: nothing can recover a section from a file it was never in, so the import counts them for you and says how many were left out — that is your cue to go back to the card in the folder it came from. An ordinary exported card is the published document, not a backup of your working copy.
From a file made with Export with hidden sections they do come back, in full — words, translations and photographs — and they come back still hidden, exactly as the author left them. They will not print until somebody switches them back on with the eye control.
That second button is the supported way to hand somebody a card with its hidden sections intact. Copying a card’s .json file out of 05_Cards/ is not — Import… only accepts a file that CIC Maker exported, and it refuses a bare card file. The other route is the old one: give your colleague access to the folder the card lives in and let them open it there.
Hiding is a printing decision, not a security control. If a section holds something nobody outside your team should ever read, delete it rather than hide it: a deleted section cannot be un-hidden by the next person to open the card, and it cannot ride inside a with-hidden export either.
13. Using it on a phone
The editor works on a phone. It is laid out differently, because a phone screen is not a small desktop.
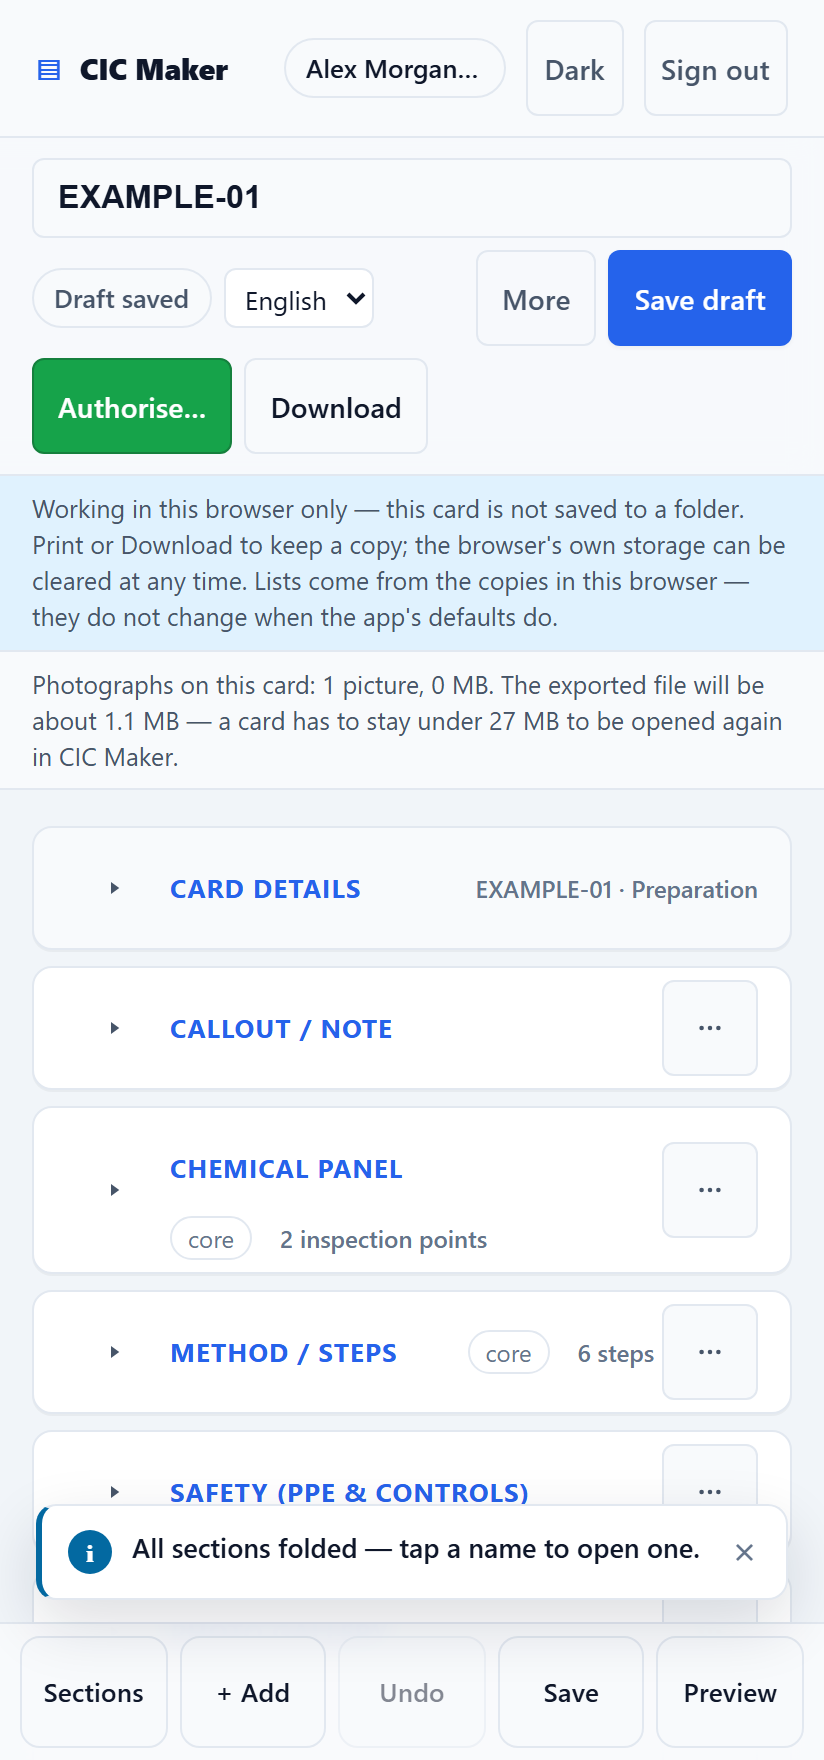
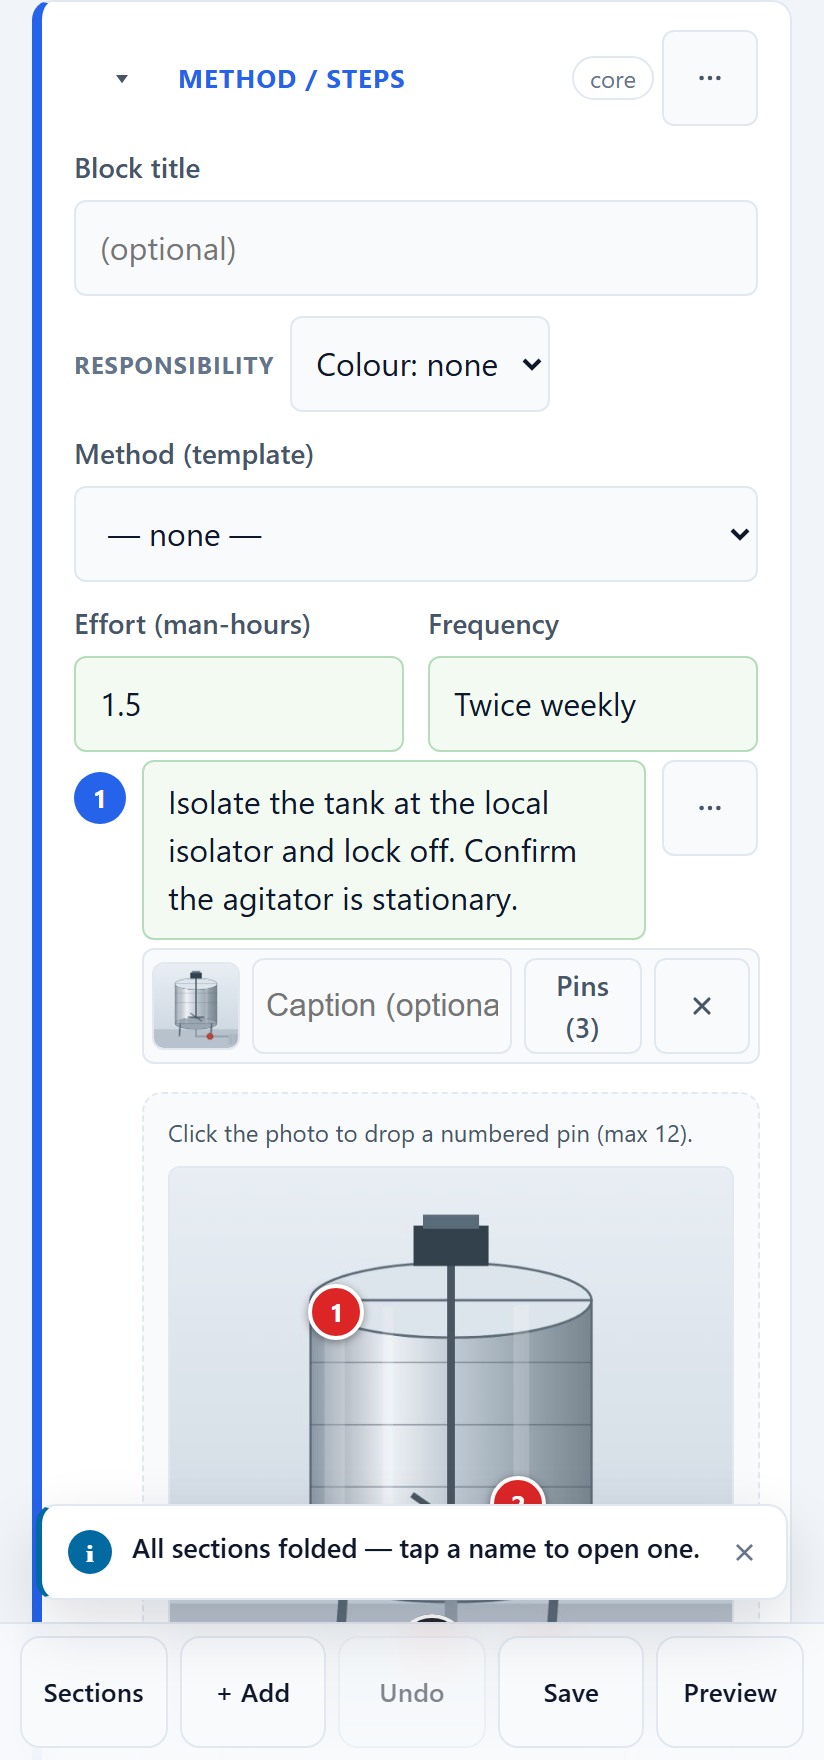
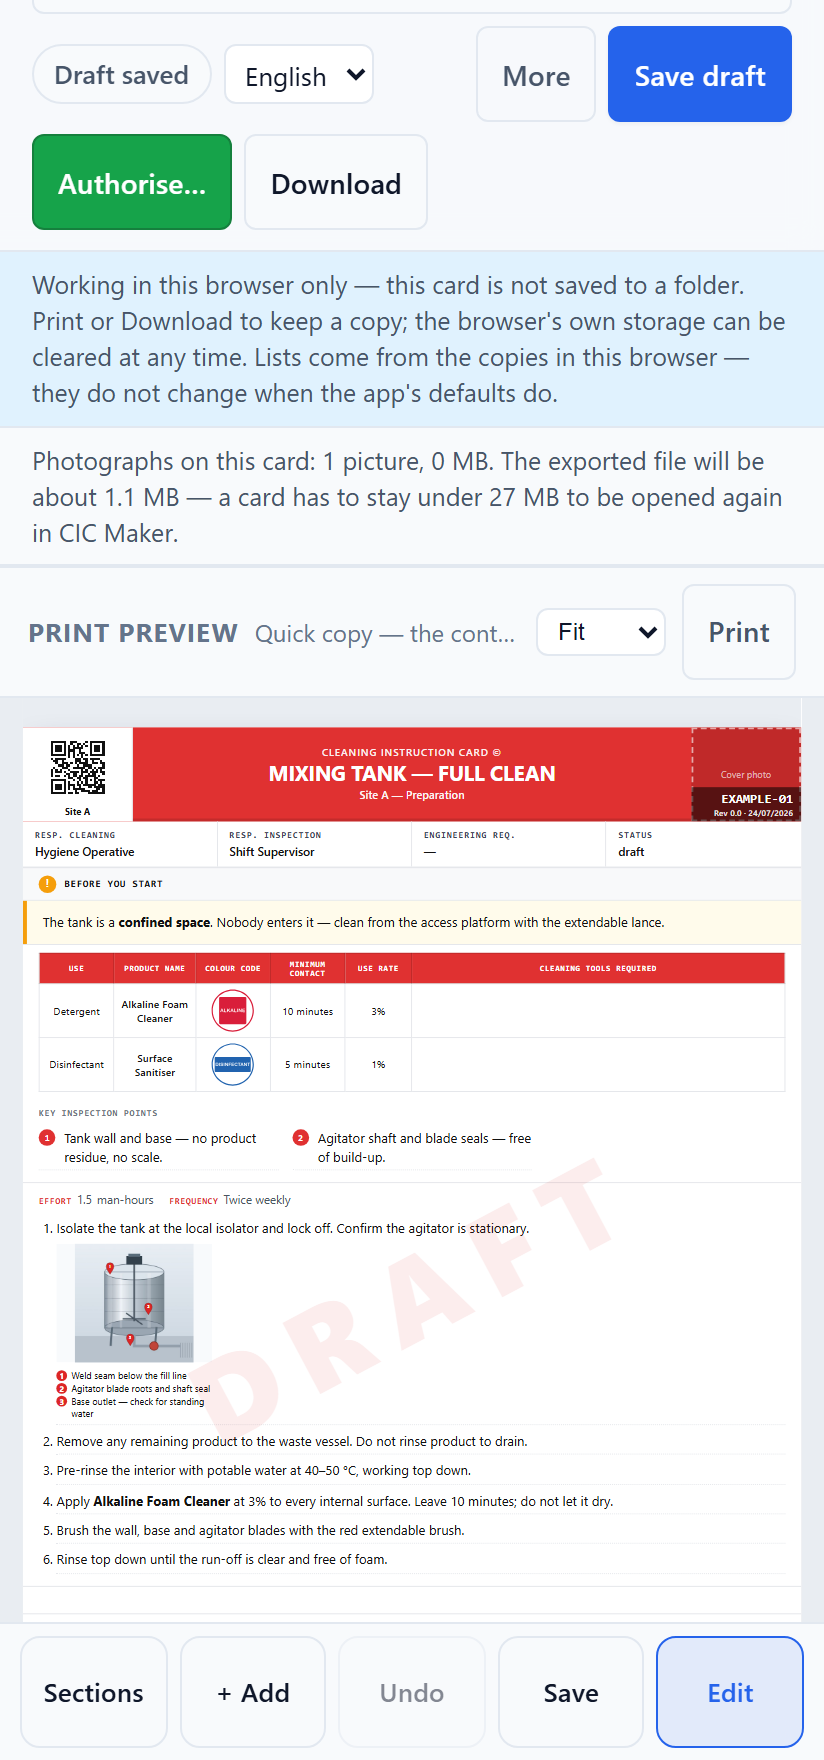
- The bottom bar is always there: Sections, + Add, Undo, Save, Preview. Those are the five things you actually do while standing at a machine.
- Sections folds everything into an outline — tap it again to open everything back up.
- Tapping a section name opens that one and folds its neighbours, so you are never scrolling past six open sections to reach the seventh.
- The button on a row opens the same move, hide and remove buttons as a sheet from the bottom, big enough to hit with a thumb.
- Preview is a toggle. Press it again to get back to editing.
One thing a phone cannot do: connect a folder. Mobile browsers do not support it. On a phone you are in browser-only mode, which is fine for adding photographs to a card and then finishing it at a desk.
14. If something goes wrong
These are the things that actually catch people out.
- “Connect a folder” is greyed out. Your browser does not support folder access. Use Chrome or Edge on a desktop or laptop, or carry on in browser-only mode.
- The app asks for the folder again. Browsers drop folder permission after a while, and always when the folder moves or the drive letter changes. Reconnect the same folder; nothing is lost.
- The printed card is missing its colours. Background graphics is switched off in the print dialog. Turn it on.
- The card prints on more pages than you expect. A photo gallery or a big table cannot be split across a page, so it moves to the next page as a whole. Try setting that section to Small, or move a short section above it to fill the gap.
- A dropdown is empty or missing a choice. Check the matching CSV in
02_Templates/. The usual causes are a missing header row, or the file still being open in Excel when the app tried to read it. - An icon shows as words instead of a picture. The image file named on the card is not in
03_Assets/01_Icons/any more. Put it back, or pick a different icon. - Export is refused. The message always names the reason. The usual three: the card is still a draft (use Download if you only need a copy of a draft); the card has been edited since it was authorised, so authorise the change first; or the card is assigned to more than one area, which only happens to a card imported from somewhere else — open it, pick the one area it belongs to, then authorise and export again.
- A field is greyed out and will not take text. You are editing in a language other than English and that field is one that never translates. Switch the toolbar dropdown back to English to change it. See what does not translate.
- Photos will not add. The card needs a reference first — photographs are stored in a folder named after it. Fill in the reference, then try again.
- You are not sure the card saved. Look at the status pill next to the reference. Unsaved draft means there are changes not yet written. Press Save draft.
- Something else. Open Diagnostics at the very bottom of the workspace. It shows what the app has loaded and the last errors it saw, which is the useful thing to send if you report a problem.
Nothing you do here reaches the internet. There is no server, no account and no analytics — see the privacy policy. That also means nobody can recover your work for you, so keep the folder somewhere that gets backed up.
CIC Maker — made by Jakub Rimek, freelance developer, Fife · What is a CIC? · Privacy policy · Example card · Licence